Author: jturrell

Introduction to Essbase Hybrid Aggregation Mode

The Best Thing Since Sliced Data

If you haven’t heard about Essbase Hybrid Aggregation Mode, you’re not alone. Oracle slipped this new calculation engine into the 11.1.2.3.500 patch without much fanfare. Documentation was light, and the list of limitations was long, however Oracle’s release strategy allowed early adopters to try out some fairly amazing new features. As a side benefit, the lack of documentation effectively prevented anyone from trying Hybrid Aggregation Mode in a production environment before the technology had time to “mature”.

When 11.1.2.4 was released, the list of limitations started to shrink. It reminded me of the release of ASO Essbase (when there was no writeback). That limitation didn’t last long, and the product became much better over time. I suspect we can anticipate the same rapid progress with Hybrid Aggregation Mode.

So what is it?

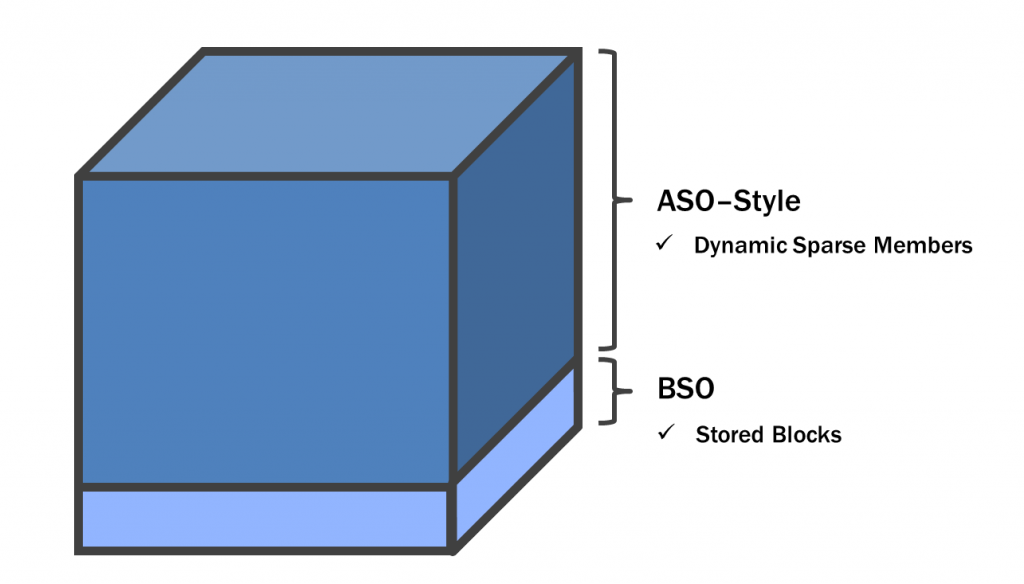
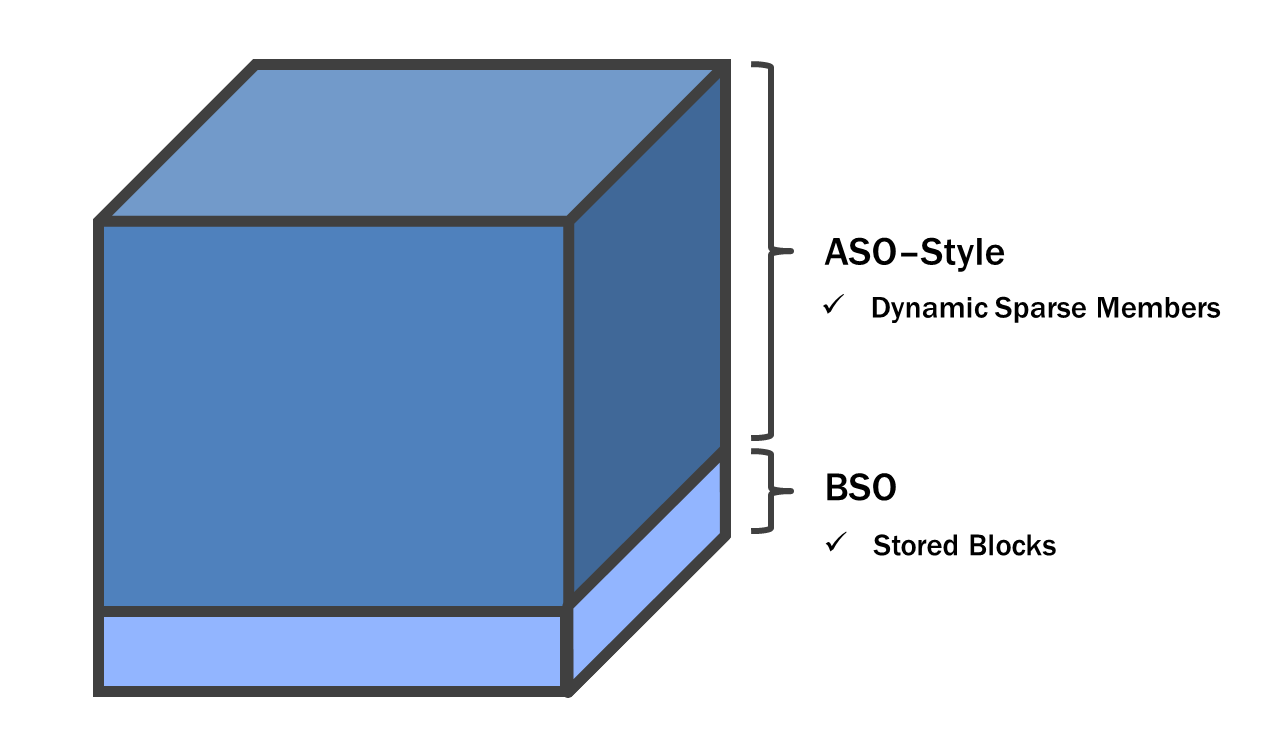
Hybrid Aggregation Mode is an option applied to BSO Essbase cubes that combines the strengths of BSO and ASO into a single cube. In simple terms, the bottom of the cube is BSO, while upper-level sparse member combinations are calculated dynamically . . . ASO-style.

2-23-2015 9-29-17 PMThe Benefits

This combination of features allows something special. It allows the BSO portion of the cube to be calculated using normal BSO calc scripts. But here’s the magic . . . sparse dimensions do not need to be aggregated. Just like an ASO cube, these aggregations are performed when the user retrieves data, in memory. This means developers don’t need to worry about level-0 data not aggregating correctly just because an agg script hasn’t completed. Sparse aggregations are effectively real-time, which is a serious step towards OLAP nirvana.

This design has some really interesting side effects. Because there are so few blocks in the cube, database restructures are much faster. Developers have a certain amount of control here as they can determine how much of the cube is BSO vs. ASO (I’ll show you how in our example). This has a follow-on effect of faster batch times and lower disk space requirements.

The most important benefit is reduced complexity.  Think of all of the applications out there that cobble together BSO and ASO cubes for maximum performance. These solutions require some serious jujitsu to keep hierarchies, data and security in sync. Now imagine these solutions reduced to a single cube . . . sounds pretty good, right?

The Catch

Unfortunately, the news isn’t all good. When a user retrieves data, Essbase will first try to perform the calculation (or aggregation) using Hybrid Aggregation Mode. If this is not possible (and there are a number of reasons why this might be the case), Essbase will try to perform a dynamic sparse calculation using Block Storage Mode. You may recall from Essbase Bootcamp that dynamic sparse calculations are not very efficient. Depending on how many blocks the calculation requires, these calculations can result in very poor retrieval performance. With enough users executing these performance crushing retrieves, the developer is essentially launching a denial of service attack on their own Essbase server. Therefore, it is very important to understand what calculations will fire in Hybrid, and what calculations will not. Let’s explore the details in our example below.

The Steps

The main steps for leveraging Hybrid Aggregation Mode are as follows:

  1. Create a BSO Essbase Cube
  2. Modify the Essbase Config File
  3. Set Upper-Level Sparse Members to Dynamic
  4. Load Data
  5. Calculate “Base” Blocks (if necessary)
  6. Retrieve Data
  7. Review the Log File

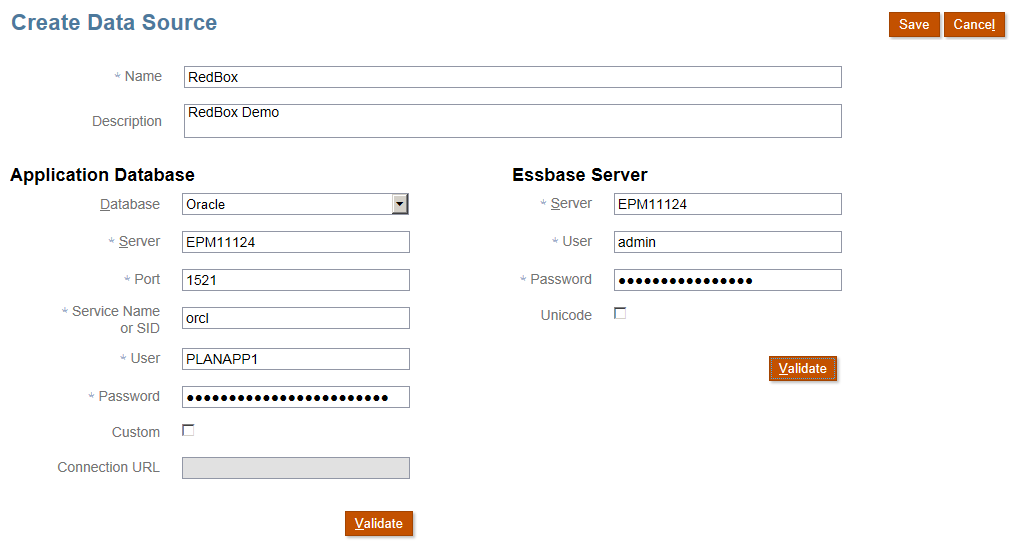
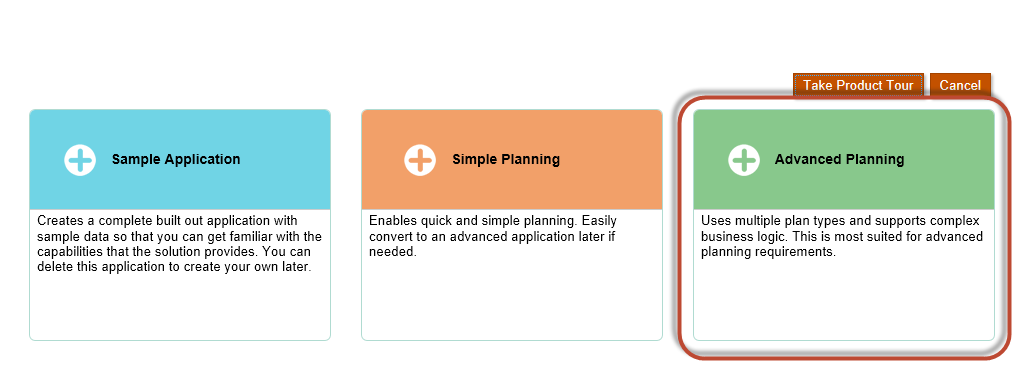
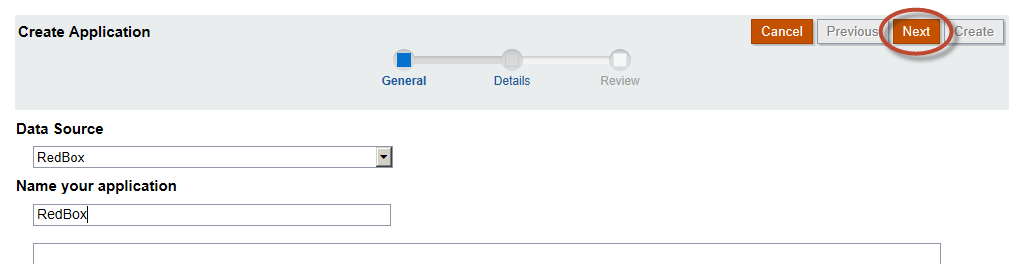
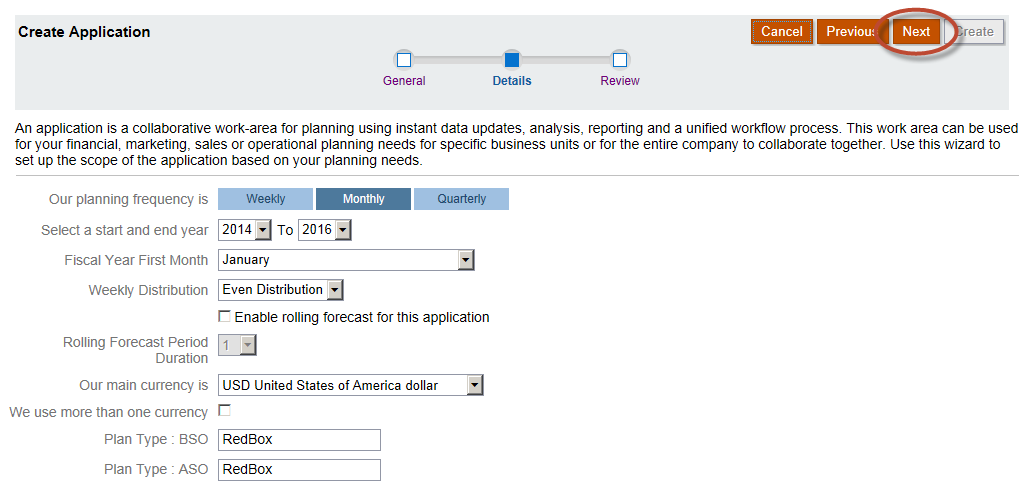
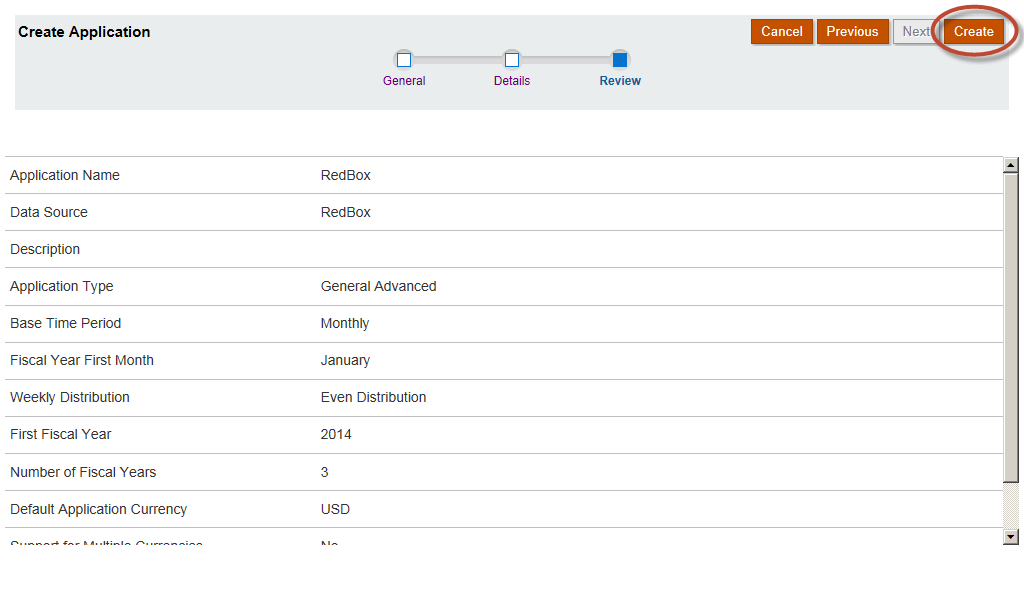
Step 1:  Create a BSO Essbase Cube

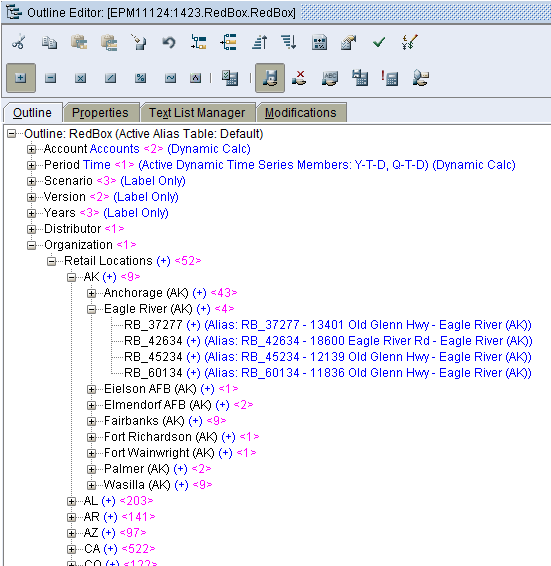
I’m going to assume most readers can create a BSO Essbase cube. There’s no need to build a fancy cube to play with Hybrid Aggregation Mode. I’m going to use a RedBox demo I built for a presentation to the North Texas Hyperion User Group. It’s simple, but it’s large.  It includes every RedBox location in the country.

3-2-2015 8-02-53 PM

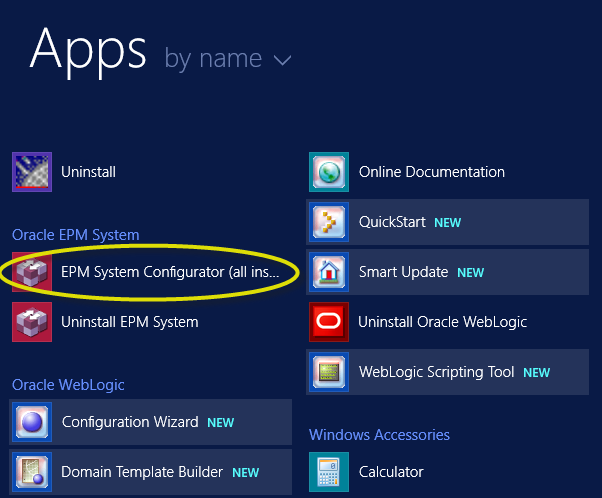
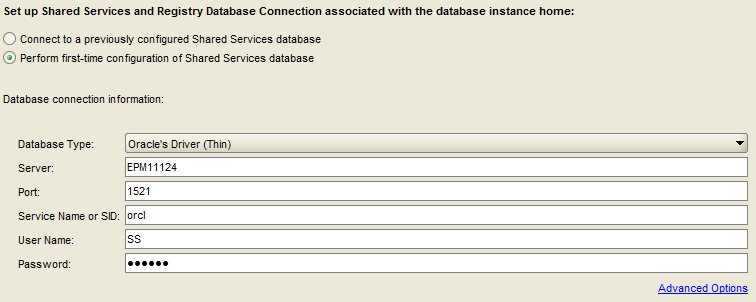
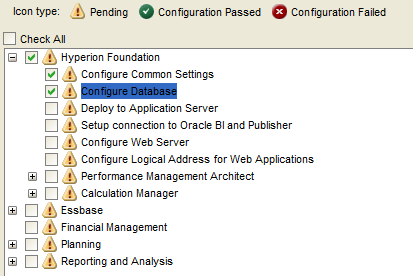
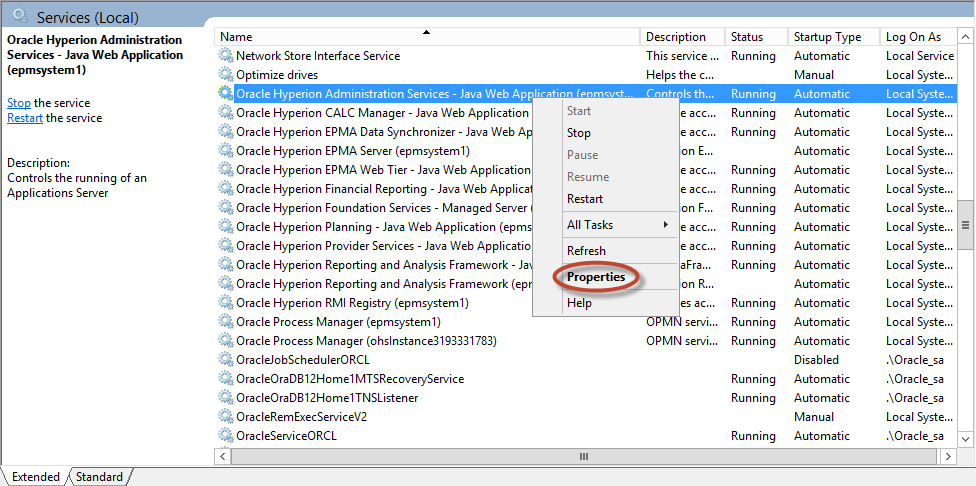
Step 2:  Modify the Essbase Config File

To enable Hybrid Aggregation Mode, a setting is required in the Essbase Config file called “ASODYNAMICAGGINBSO”. This setting can be enabled or disabled for an entire server, application or specific database.

3-2-2015 8-23-59 PM

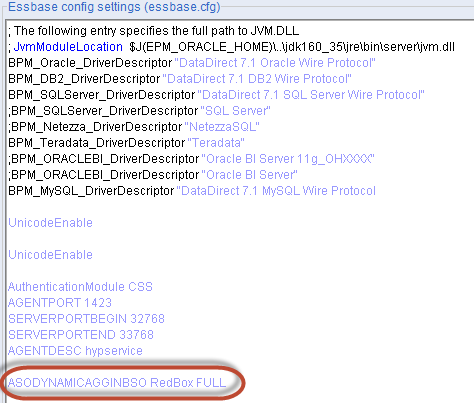
Developers can select from “Partial”, “Full” or “None” mode.

  • Partial enables Hybrid Aggregation Mode for simple outline aggregations (+, -, ~) only. Everything else (formulas, other unary operators, etc) will fire in Block Storage Mode.
  • Full enables Hybrid Aggregation Mode for simple outline aggregations (+, -, ~) and for certain formulas.  Note that there are quite a few limitations that we will cover later.
  • None disables Hybrid Aggregation Mode. This is the default.

Additional details on this setting for version 11.1.2.4 can be found here in the Essbase technical reference. Developers using version 11.1.2.3.500 will need to review the patch readme files.

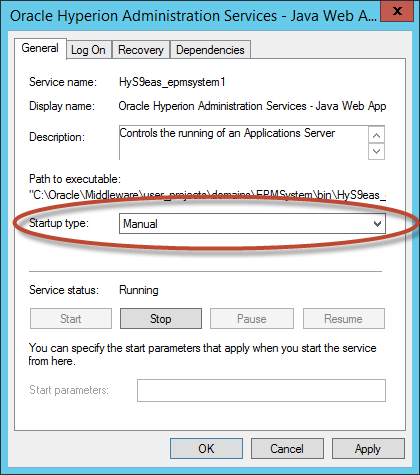
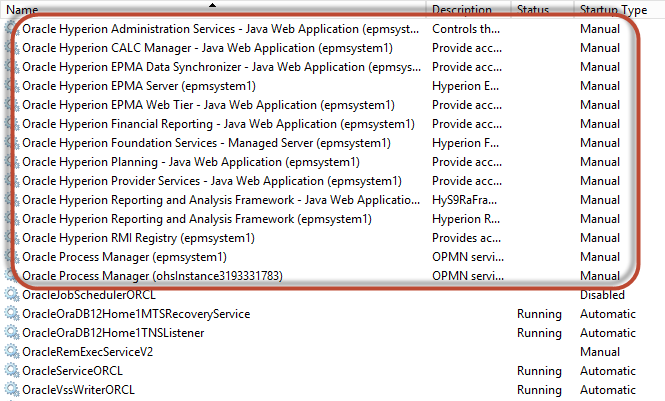
Don’t forget to restart Essbase after updating the Config file.

Step 3:  Set Upper-Level Sparse Members to Dynamic

If you’ve worked with Essbase for very long, you probably know that Dynamic calculations work best with Dense dimensions and can be used sparingly with certain Sparse dimensions. But under no circumstances would we ever set all of our upper-level Sparse members to Dynamic . . . until now.

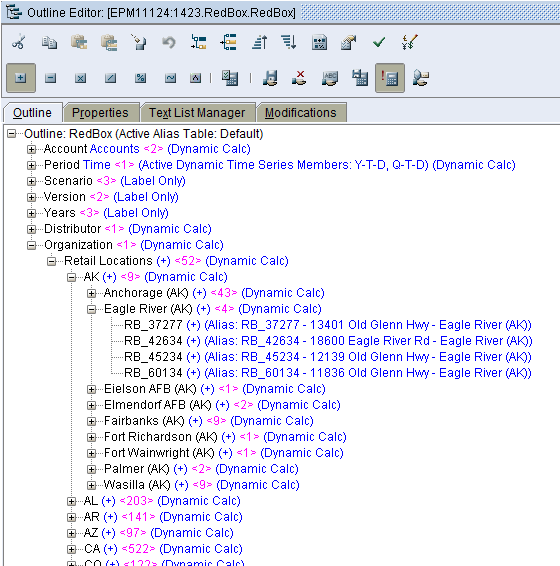
It seems crazy, but if you want to leverage Hybrid Aggregation Mode, you will need to set at least some of your upper-level sparse members to “Dynamic Calc”. In this example, I’m going to set them all to Dynamic. Just remember . . . any sparse members not set to dynamic will need to be aggregated with a calc script (assuming they are aggregated dimensions).

3-2-2015 11-36-54 PM

Step 4:  Load Data

We will need data for testing purposes. Mine is all fake test data . . . about 48,000 records.

Step 5:  Calculate “Base” Blocks (if necessary)

If you’ve ever written a procedural calculation for an ASO cube, you know they’re a bit clunky (even with the enhancements to Calc Manager). Hybrid Aggregation Mode gets us away from this technology by allowing us to use BSO Calc Scripts against the BSO portion of the cube. Remember, the “BSO portion of the cube” is represented by the non-dynamic sparse member combinations. In my example, this is simply level zero sparse members (because I set all aggregated upper-level sparse members to “Dynamic Calc”).

So if you need to run a stored calculation, break out your old BSO calc scripting skills! But make sure you only reference the BSO portion of the cube in your calc script, otherwise, you’ll take a performance hit.

Step 6:  Retrieve Data

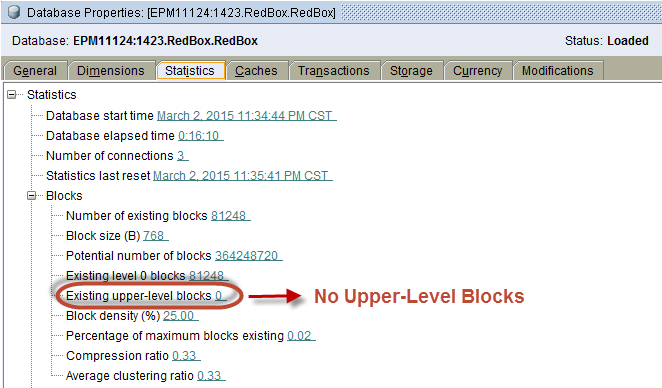
This is it . . . La Pièce de Résistance!!!  We can now retrieve data at upper-level sparse member combinations, and we never had to aggregate our cube. In fact, our cube has no upper-level blocks at all.

3-2-2015 11-48-23 PM

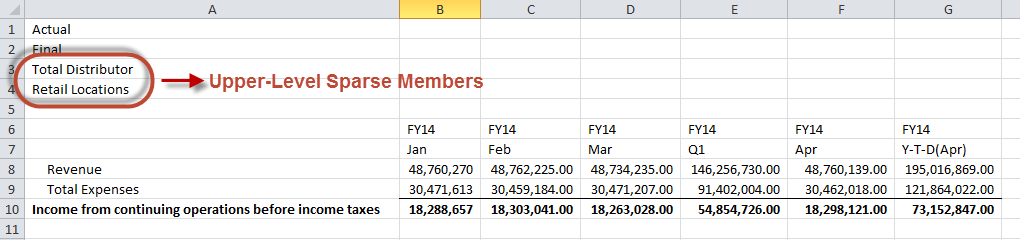
Some interesting notes about the query above:

  • Note that Hybrid now supports Dynamic Time Series & Time Balance (not supported in 11.1.2.3.500).
  • In Block Storage Mode, without pre-aggregation, this query would have required over 40,000 blocks.
  • In Hybrid Aggregation Mode, the query only took 0.38 seconds (with no tuning whatsoever).

3-2-2015 11-56-35 PM

Step 7:  Review the Log File

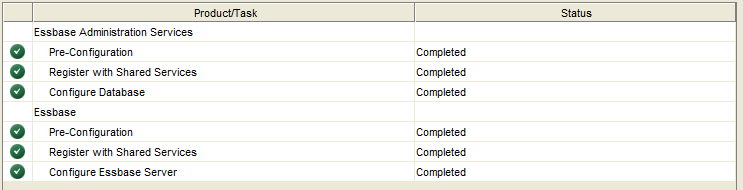
The best way to verify that a query successfully ran in Hybrid Aggregation Mode is to look in the application log.

3-2-2015 11-44-47 PM

The green circle above indicates that a query ran in Hybrid Aggregation Mode.

Here’s an example of a query that did not successfully run in Hybrid Aggregation Mode.

3-3-2015 12-06-37 AM

You’ll want to monitor your logs to ensure the text above (circled in red) isn’t showing up.  The good news is that if Hybrid fails, Essbase will tell you why. The error above tells me that it failed because I have a member called “ThisIsABadAccount”, and it has a cross-dimensional operator in the formula.  We will cover Hybrid Aggregation Mode limitations in more detail below.

3-3-2015 12-10-16 AM

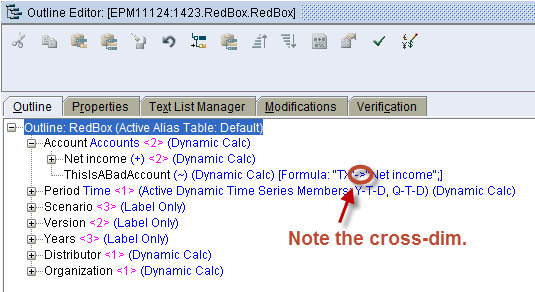
It should be noted that the member formula above is perfectly acceptable as long as you’re retrieving data in the BSO section of the cube. But once you stray into the ASO section (think upper-level sparse member), the query goes south and reverts back into Block Storage Mode (and becomes quite slow).

Certain Limitations Apply

There is a healthy list of limitations regarding formulas that can execute in Hybrid Aggregation Mode. But keep in mind these only apply to calculations you’re running in memory in the ASO portion of the cube, and not to stored calculations that you may execute as part of a calc script on the BSO portion of the cube. None of the limitations below apply to your BSO calc script as long as it is referencing stored sparse member combinations.

Some things you can not do in Hybrid Aggregation Mode:

  • Attribute Calcs
  • Formulas with Cross Dimensional Operators
  • Dynamic Calcs with Formulas that are Target of Transparent Partition
  • Queries with both Two Pass and One Pass Dynamic Calc members from Same Dimension
  • XOLAP
  • Text Measures

Any of the above situations will cause your Essbase query to revert back to Block Storage Mode. This doesn’t mean that the query won’t work. But it probably means it’ll be slow. Potentially very slow.

In addition to the limitations above, there are restrictions on formulas that reference other dimensions. The situations below will work in Hybrid Aggregation Mode.

(Anything else will not.)

  • Sparse-to-Sparse:   Formula on Sparse member . . . only references other Sparse members.
  • Dense-to-Dense:   Formula on Dense member . . . only references other Dense members.
  • Sparse-to-Sparse_AND_Dense:   Formula on Sparse member . . . references both Sparse and Dense members. In this case, dense members must be stored.

Lastly, there are certain formulas that are not supported with Hybrid. For a complete list, click here. This list is different for 11.1.2.3.500, so check the Essbase readme file if you’re using that version.

Remember that by querying members with formulas, Essbase will revert to Block Storage Mode if the “ASODYNAMICAGGINBSO” property is set to “Partial”. Use “Full” if you plan on leveraging member formulas with Hybrid Aggregation Mode.

An Ounce of Prevention is Worth a Pound of Cure

We spend a lot of time testing our cubes. But what if we miss something? Imagine a scenario where your user executes a query, and for whatever reason, the query reverts back to Block Storage Mode. Essbase is now feverishly trying to pull a bazillion blocks into memory. Now imagine that lots of other users are running the same query. The lights in the building start to dim . . . you might want to put a query governor in place.

We can limit either the amount of time a query will run, or the number of blocks a query can reference (or both).

QRYGOVEXECTIME [appname [dbname]] n

– Sets max amount of time a query can execute before being terminated

– Measured in seconds

QRYGOVEXECBLK [appname [dbname]]

– Sets max number of blocks a query can retrieve before being terminated

Conclusions

When Hybrid Aggregation Mode came out with the 11.1.2.3.500 patch, there were two deal-killer limitations. Both Dynamic Time Series and Time Balance account settings would force calculations back to Block Storage Mode. And with the limitations on formulas, it was impossible to create your own custom DTS or Time Balance. Both of these limitations were addressed with 11.1.2.4. Many of the remaining limitations appear to have workarounds (try moving complex calc logic to calc scripts). In my opinion, the limitations are getting much less restrictive.

Is Hybrid ready for production cubes? Maybe. That will depend on risk tolerance within your organization. It’s still very new. But with the enhancements in 11.1.2.4, the documentation, and the support for usage with Hyperion Planning . . . it’s getting tempting.

Pop Quiz!

You’ve read this far . . . surely you want to test your knowledge, right?

I’ll post answers on the blog in a week or so.

  1. Which of the following steps are required to enable Hybrid Aggregation Mode?
    1. Essbase Config File Setting
    2. Create a BSO Essbase Cube
    3. Set Upper-Level Dense Members to “Dynamic Calc”
    4. Pray to the Hyperion Gods
  2. True or False:   Essbase 11.1.2.3.500 supports dynamic time series with Hybrid Aggregation Mode.
  3. True or False:   Sparse dynamic calculations are generally fast in Block Storage Mode.
  4. True or False:   Essbase does not create upper-level blocks associated with dynamic sparse member combinations when Hybrid Aggregation Mode is enabled.
  5. True or False:   A formula that is not technically supported in Hybrid Aggregation Mode may actually run in Hybrid Aggregation Mode if the query avoids upper-level sparse dynamic member combinations.
  6. True or False:   The default “mode” for the “ASODYNAMICAGGINBSO” Essbase config file setting is “None”.
  7. True or False:   Developers should use Essbase query governors if Hybrid Aggregation Mode is enabled.
  8. True or False:   Multiplication and Division unary operators will function in Hybrid Aggregation Mode.
  9. True or False:   A formula on a Dense member that references a Sparse member will execute in Hybrid Aggregation Mode.
  10. True or False:   A query that includes both a Two-Pass and a One-Pass dynamic calc member from the same dimension will execute in Hybrid Aggregation Mode.

Bonus Question!  (This wasn’t covered in the post, so you may have to search . . . )

True or False:   The file system associated with the ASO-style portion of a Hybrid cube disappears when the application is stopped.

I hope you’ll take Hybrid Aggregation Mode for a spin!

DIY Hyperion Planning – Create a Planning App

Some Context . . .

This is the ninth (and final) post in a multi-part blog educating readers on how to build a personal “sandbox” environment for Hyperion Planning. Click here to see all nine posts in the series.

Creating a Test Hyperion Planning Application

Once the EPM products are configured, there are three additional prerequisites for creating an application:

  • Create the Planning Application Repository
  • Create the Planning Application Repository Schema User
  • Create the Planning Data Source

If you’ve been following this tutorial from the beginning, you will have already created the Repository (PLANAPP1) and Repository User (also PLANAPP1). These were created when you pasted the SQL code into SQL Plus.

For the purposes of this example, we will be creating a “Classic” Hyperion Planning application. The alternative approach (using EPMA) is rapidly losing popularity. Oracle does not appear to be investing in this product, so “Classic” it is . . .

Start the EPM Services

Locate the “Start EPM System” icon within the apps on your VM. (I would recommend right-clicking on this icon and selecting “Pin to Start”. Do the same with the “Stop EPM System” script.) Run the start script to startup the EPM services on your VM. Some notes about the startup process:

  • On my laptop, startup takes a little less than 9 minutes.
  • Faster processors and hard drives will improve startup time.
  • Compact deployments will start faster than “regular” deployments.
  • The script will close when startup is complete.
  • Watch Task Manager on the VM during startup to monitor CPU and memory utilization.
  • Upon completion of the script, ensure that all services started as expected.
  • Don’t forget to stop the EPM services before you shut down your VM.

Create a Data Source

Once the services have started, open a browser on your host. Navigate to the following URL:

http://<INSERT SERVER NAME HERE>:8300/HyperionPlanning

2-17-2015 11-46-14 AM

Enter the Shared Services admin user ID and password.

Select “Sign In”.

2-17-2015 11-49-38 AM

Select “Manage Data Source”.

2-17-2015 11-50-02 AM

Select “Create”.

2-17-2015 8-08-47 AM

Enter the App Database connectivity information.

Enter the Essbase Server connectivity information.

Validate each connection.

Select “Save”.

Create the Planning Application

2-17-2015 8-10-22 AM

Select Manage Applications

2-17-2015 8-12-30 AM

Select “Create”.

2-17-2015 8-55-03 AM

Select “Advanced Planning”.

2-17-2015 8-55-46 AM

Name your application and select “Next”.

2-17-2015 8-57-05 AM

Select the application parameters. The simplified Planning interface appears to force applications to have an ASO plan type.

(This would appear to be a bug, as the on-premise interface does not require this.)

Select “Next”.

2-17-2015 8-57-38 AM

Review the application settings. Select “Create”.

2-17-2015 8-58-10 AM

Planning will begin creating the application.

2-17-2015 8-58-35 AM

Select “OK”. The application interface will be displayed.

2-17-2015 8-58-58 AM

Next Steps

With the application created, users may now begin the typical Hyperion Planning development activities, including:

  • Building Dimensions
  • Building Input Forms
  • Loading Data
  • Building Calc Manager Rules
  • Building Reports
  • Creating Approvals Processes

DIY Hyperion Planning – Configure Hyperion Planning

Some Context . . .

This is the eighth post in a multi-part blog educating readers on how to build a personal “sandbox” environment for Hyperion Planning. Click here to see all nine posts in the series.

Installation vs Configuration

When we installed Hyperion Planning and the related EPM applications in the previous post, we installed all products at once. As we move on to configuration, we will configure the products one at a time. Could we attempt to configure everything at once? Yes, however in previous versions, this caused problems, so we will take a more conservative approach.

Configure Shared Services

To launch the configuration utility, navigate to the Apps window in Server 2012 (from the Start Menu).

2-9-2015 1-48-44 PM

Right-click on the “EPM System Configurator” and select “Run as Administrator”. The EPM System Configurator will be displayed.

2-9-2015 1-51-33 PM

Select the Home Directory and Instance Name. Select “Next”.

2-13-2015 4-40-42 PM

Select “Perform first time configuration of Shared Services database”.

Confirm the database driver, server and port.

Enter the Oracle SID, user name and password for the Shared Services repository.

ENSURE THAT THE USER ID AND PASSWORD ARE CORRECT!!! If the wrong user ID and password are used, Shared Services tables and other objects will be created in the wrong schema, making a mess.

Select “Next”.

The screen below should be displayed.  If a network IO error is displayed instead, please see the point in the previous post about updating the server name in the “listener.ora” file.  Ensure that the server was rebooted (or the Oracle RDBMS service restarted) after that change.

2-9-2015 2-07-42 PM

Select “Uncheck All” and expand “Hyperion Foundation”.

2-9-2015 2-10-23 PM

Select “Configure Common Settings” and “Configure Database”.

Select “Next”.

2-14-2015 12-01-19 AM

Accept the defaults and select “Next”.

2-9-2015 2-13-19 PM

Enter a user ID and password for the Shared Services admin user.

Make a note of this very important user ID and password.

Select “Next”.

2-9-2015 2-14-20 PM

Confirm the configuration tasks.

Select “Next”.

2-9-2015 2-22-02 PM

Ensure that all configuration steps are successful.

Select “Task Panel” to continue the configuration process, or “Finish”. If “Finish” is selected, simply restart the Config Tool to continue the configuration process.

Configure Essbase and EAS

Select the options below in the Config Tool to configure Essbase and EAS.

2-9-2015 3-00-02 PM

Select “Next”.

2-13-2015 5-02-00 PM

Update the Username and Password for the correct EAS schema.

ENSURE THAT THE USER ID AND PASSWORD ARE CORRECT!!! If the wrong user ID and password are used, EAS tables and other objects will be created in the wrong schema, making a mess.

Select “Next”.

2-13-2015 5-05-29 PM

Accept the default Essbase server information. Select “Next”.

2-13-2015 11-58-26 PM

Confirm the configuration tasks.

Select “Next”.

2-9-2015 7-59-59 PM

Ensure that all tasks complete successfully.

Select “Task Panel” to continue the configuration process, or “Finish”. If “Finish” is selected, simply restart the Config Tool to continue the configuration process.

Configure EPMA

Select the options below in the Config Tool to configure EPMA.

2-9-2015 8-04-41 PM

Select “Next”.

2-13-2015 5-13-22 PM

Update the Username and Password for the correct EPMA schema.

ENSURE THAT THE USER ID AND PASSWORD ARE CORRECT!!! If the wrong user ID and password are used, EPMA tables and other objects will be created in the wrong schema, making a mess.

Select “Next”.

2-9-2015 8-07-41 PM

Accept the default dimension server ports.

Select “Next”.

2-9-2015 8-08-31 PM

Confirm the configuration tasks.

Select “Next”.

2-9-2015 8-12-44 PM

Confirm that all configuration steps completed successfully.

Select “Task Panel” to continue the configuration process, or “Finish”. If “Finish” is selected, simply restart the Config Tool to continue the configuration process.

Configure Planning

Select the options below in the Config Tool to configure Planning.

2-9-2015 8-19-17 PM

Select “Next”.

2-13-2015 5-25-10 PM

Update the Username and Password for the correct Planning schema.

ENSURE THAT THE USER ID AND PASSWORD ARE CORRECT!!! If the wrong user ID and password are used, Planning tables and other objects will be created in the wrong schema, making a mess.

Select “Next”.

2-9-2015 8-21-19 PM

Accept the default RMI port.

Select “Next”.

2-9-2015 8-22-46 PM

Confirm the configuration tasks.

Select “Next”.

2-9-2015 8-27-08 PM

Confirm that all configuration steps completed successfully.

Select “Task Panel” to continue the configuration process, or “Finish”. If “Finish” is selected, simply restart the Config Tool to continue the configuration process.

Configure Calc Manager

Select the options below in the Config Tool to configure Calc Manager.

2-9-2015 8-35-12 PM

Select “Next”.

2-13-2015 7-43-44 PM

Update the Username and Password for the correct Calc Manager schema.

ENSURE THAT THE USER ID AND PASSWORD ARE CORRECT!!! If the wrong user ID and password are used, Calc Manager tables and other objects will be created in the wrong schema, making a mess.

Select “Next”.

2-9-2015 8-36-44 PM

Confirm the configuration tasks.

Select “Next”.

Confirm that all configuration steps completed successfully.

2-9-2015 8-39-30 PM

Select “Task Panel” to continue the configuration process, or “Finish”. If “Finish” is selected, simply restart the Config Tool to continue the configuration process.

Configure Financial Reports

Select the options below in the Config Tool to configure Financial Reports.

2-9-2015 8-44-31 PM

Select “Next”.

2-13-2015 7-57-05 PM

Update the Username and Password for the correct Reporting and Analysis schema.

ENSURE THAT THE USER ID AND PASSWORD ARE CORRECT!!! If the wrong user ID and password are used, Reporting and Analysis tables and other objects will be created in the wrong schema, making a mess.

Select “Next”.

2-9-2015 8-47-06 PM

Select the default location and port range.

Select “Next”.

2-9-2015 8-47-56 PM

Accept the default ports.

Select “Next”.

2-9-2015 8-49-01 PM

Select the default RMI ports.

Select “Next”.

2-9-2015 8-50-23 PM

Confirm the configuration tasks.

Select “Next”.

2-9-2015 8-57-17 PM

Confirm that all configuration steps completed successfully.

Select “Task Panel” to continue the configuration process, or “Finish”. If “Finish” is selected, simply restart the Config Tool to continue the configuration process.

Deploy the App Server

The previous steps configured the repositories of each individual product. The next step is to deploy to the application server. We will do this for all products at once.

Select the options below in the Config Tool to deploy to the application server.

2-9-2015 9-09-56 PM

Select “Next”.

2-13-2015 8-25-49 PM

Enter a password for the domain admin.

Select “Next”.

2-9-2015 9-24-15 PM

Pay special attention to the check box at the top of this screen. The option to deploy the Java web applications to a single managed server is referred to as a “Compact Deployment”. Compact Deployment is often useful when limited server memory is available. (E.g., less than 16GB) Unfortunately, compact deployment can make it difficult to debug problems with individual products. I prefer to not use Compact Deployment; however there are situations where it is appropriate.

Select “Next”.

2-9-2015 9-33-47 PM

Confirm the configuration tasks.

Select “Next”.

2-9-2015 11-23-39 PM

Confirm that all configuration steps completed successfully.

Select “Task Panel” to continue the configuration process, or “Finish”. If “Finish” is selected, simply restart the Config Tool to continue the configuration process.

Configure Web Server

Select the options below in the Config Tool to configure the web server.

2-9-2015 11-29-55 PM

Select “Next”.

2-9-2015 11-38-32 PM

Use the Oracle HTTP Server.

Select “Next”.

2-9-2015 11-39-50 PM

Confirm the configuration tasks.

Select “Next”.

A command prompt will open.  A script will launch and eventually close.

2-9-2015 11-53-47 PM

Confirm that the configuration was a success.

Select “Finish”.

Configure the Services

The services created by the Config Tool in the previous steps will be set to start automatically. I prefer setting these to start manually. They can then be started by running the pre-built startup and shutdown scripts.

** NOTE – Most infrastructure consultants create custom start/stop scripts.

To change the services to manual startup, navigate to Control Panel by selecting the “Start” button.

Select “Administration Tools”.

2-10-2015 11-31-45 AM

Double-click “Services”. Scroll down to the Oracle services.

2-10-2015 11-33-05 AM

Right-click on each Oracle service (except RDBMS services) and select “Properties”.

2-10-2015 11-33-45 AM

Change the startup type to “Manual”.

Select “OK”.

2-10-2015 1-03-52 PM

Perform this step for each service in the red square above. The remaining Oracle services are RDBMS-related, and can be left as-is.

Starting the EPM System

Restart your VM.

Navigate to the applications in Windows Server 2012.

2-10-2015 3-46-14 PM

Take note of the two scripts above used to Start and Stop EPM services (circled in green).

Select the “Start EPM System” icon. A script will run to start the EPM services (this may take a bit). Once the script completes, confirm that all Oracle EPM services are running by navigating to Services.

2-12-2015 4-00-13 PM

Alternatively, you may also review the startup logs in:

C:\Oracle\Middleware\user_projects\epmsystem1\diagnostics\logs\starter

The Moment of Truth . . .

Open a browser on your host.

Navigate to the following URL to access Workspace:

http://<INSERT SERVER NAME HERE>:19000/workspace/index.jsp

2-10-2015 3-55-25 PM

Login with the Shared Services “admin” user ID and password.

Logout.

Navigate to the following URL to access the new simplified Hyperion Planning interface:

http://<INSERT SERVER NAME HERE>:8300/HyperionPlanning

2-17-2015 11-46-14 AM

Login with the “admin” user ID and password.

A screen will be displayed stating that there are no applications (we will create an app in the next post).

Logout.

Run the script to shut down the EPM Services. Always try to gracefully shut down the services prior to shutting down your VM.

Take a snapshot.

Congratulations!!!  You now have your very own Hyperion Planning sandbox environment.

In the Next Post

Things should be looking very good at this point.  The next step is to build an actual Hyperion Planning application!  Click here for the last post in the series.