Essbase Pro Tip: Build & Maintain Partitions in a Text Editor
Partitions in Essbase are a bit like views in a relational database. They allow the results of a query in one cube to be available in another cube. This data may be “materialized”, or physically stored in both the source and target. These are referred to as replicated partitions. Or the partition may simply provide a “window” from one cube into another. These are referred to as transparent partitions. A third type of partition, linked, isn’t really a partition at all . . . it’s more of a navigational aid. It’s important to note that linked partitions are deprecated as of Essbase 11.1.2.4. That’s a nice way for Oracle to say “stop using linked partitions even though the option is still available”.
Embrace the Command-Line
Most Essbase professionals (myself included) learned to build partitions in EAS. It has a nice tabbed GUI that walks users through the various steps:
- Type (Replicated, Transparent or Linked)
- Connection (Source & Target Connection Info)
- Areas (Source & Target Details)
- Mappings (How to Handle Specific Differences Between Source & Target)
- Validation (Is everything correct?)
There’s nothing “wrong” with this GUI . . . in the same way that there’s nothing “wrong” with training wheels. But for those of us that are comfortable in a command-line environment, a text file with good ole MaxL is just more straight-forward.
Why Ditch the GUI?
- MaxL is safer.
- MaxL is faster.
- MaxL is easier.
- MaxL is repeatable and migratable.
Have you ever “lost” a partition? Maybe it became orphaned and was no longer editable or repairable in EAS? It’s a frustrating experience, and unfortunately there are a variety of reasons partitions can head south. Building and maintaining partitions in a text editor using MaxL creates a tidy little backup. Re-creating the partition or migrating it to another environment is a snap. Simply paste some text into the MaxL command-line and you’ve got a partition!
And speaking of migrations, it’s important to note that LCM cannot currently migrate partitions (as of version 11.1.2.4). The LCM Guide recommends using MaxL for partition migrations. I recommend taking this a step further. Create and maintain your partitions in MaxL in the first place.
Show me the MaxL!
The typical MaxL statement for creating a partition can be broken down into seven sections:
- Login (Source)
- Create Command
- Source Area Definition
- Login (Target)
- Target Area Definition
- Mappings
- Logout
In the example below, I’m partitioning data from a Planning application (BSO) called “SrcApp”, into an ASO reporting cube called “TgtApp”. The Planning app (source), has a Version dimension, but the target does not. The target has a “Profit Center” and “Cost Center” dimension, however the source does not.
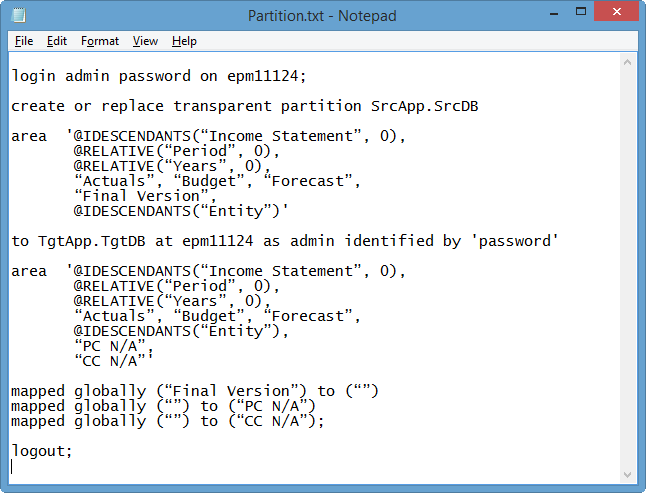
You may have noticed that there are no area alias “nicknames” in the statement above, and there is only a single area definition on the source and target. Multiple areas are allowed, and mappings at the bottom of the statement can be area-specific. But I usually find that one area definition (and global mappings) gets the job done.
Here’s what you should expect to see when the partition is pasted into MaxL:
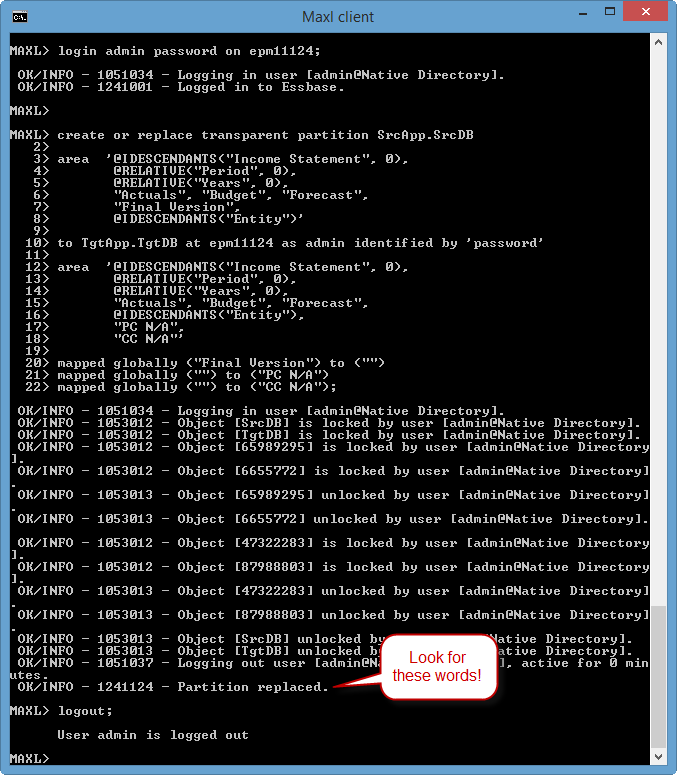
Review your results, looking for errors, warnings and in particular, cell-count mismatches.
Final Pointers
Here are some tips that may help when creating your partitions in MaxL:
- Enclose area definitions in single quotes.
- Separate members and functions within area definitions with commas.
- Do not separate mapping lines with commas.
- The first set of parenthesis in a mapping statement represents the source.
- The second set of parenthesis in a mapping statement represents the target.
- Map a member to or from a null value when a dimension in the source does not exist in the target (or vice-versa). In the example above, “Final Version” is mapped to “”, because there is no Version dimension in the target cube.
- End the entire statement with a semi-colon.
- Do not store passwords in MaxL files unless they’re encrypted.
- If you’re using Essbase clustering, make sure you login to the cluster name when you create your partition, and not the server name.
- Create partitions with service accounts, preferably ones with passwords that do not expire.