Uncategorized

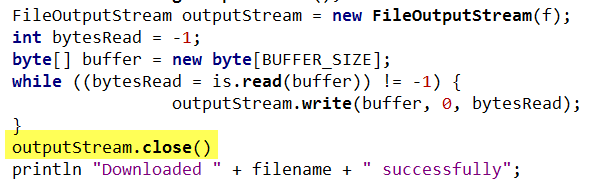
Intercompany Eliminations in PBCS

As part of a recent PBCS implementation, I had to design an Intercompany Elimination solution within a BSO plan type.  This is a relatively uncommon and somewhat complex requirement in a PBCS implementation, and as such, I was pretty excited to blog about it.  Unfortunately, the whole post nearly ended up in the garbage.

Every once in a while, you write a great post, only to find that someone else has covered the topic sooner than you, and better than you.  In my case, that person was Martin Neuliep.  In Developing Essbase Applications:  Hybrid Techniques and Practices, Martin shared a single formula that elegantly calculated Intercompany Eliminations in a BSO cube.  In addition, Martin was scheduled to discuss the topic of eliminations at Kscope in his presentation on June 28th, titled Eliminating the Eliminations Problem in Essbase.

Luckily, I had an ASO solution in addition to my BSO approach.  As it turns out, Martin was planning on sharing several elimination calculation methods in his presentation (some developed by him, and some developed by others).  Perhaps my ASO solution will make the cut?  (hint, hint)  Either way, you should check out his presentation – I will definitely be there.

With all of that said, here’s my approach to intercompany eliminations in an ASO plan type.

Why Eliminate Intercompany Transactions?

Most of my clients create their Budgets and Forecasts in a “fully eliminated” manner.  Within their financial plans, they pretend that certain transactions don’t occur, because these transactions don’t affect the company’s bottom line.  If one subsidiary has a planned (future) transaction with another subsidiary, these clients may not bother recording the transaction in their Budget or Forecast at all.  While this approach simplifies the planning process, it leaves out financial details that may be useful.

When a client’s requirements indicate that these transactions are relevant to the planning process, we need to build Intercompany Elimination logic into our PBCS applications.  The accounting behind these transactions can get pretty complex, but what we’re going to focus on today are the technical mechanics that facilitate these eliminations in PBCS, specifically in an ASO plan type.

So why do we eliminate these transactions?  Because depending on where we’re looking in the Entity dimension, we need to pretend that they never occurred.  As far as most investors are concerned, these intercompany transactions don’t count on a consolidated basis.  Imagine selling a car to your spouse . . . this transaction doesn’t change your combined income or net worth.  This leads us to an interesting question.  When and where do we eliminate these transactions?

The Land of Make Believe

Let’s start with a simple example – an imaginary company that mines raw materials and sells those materials to its manufacturing units.  These plants then sell finished goods to a distribution company.  All of these entities are part of the same vertically integrated company.  The Entity dimension in such a company might looks like this:

Image_1

To facilitate transactions between two entities in an OLAP database, it is generally beneficial to have separate Entity and Customer Dimensions.  The only unusual thing about this design is that many of the “Customers” are internal customers.  As such, our Customer dimension might look something like this:

Image_13

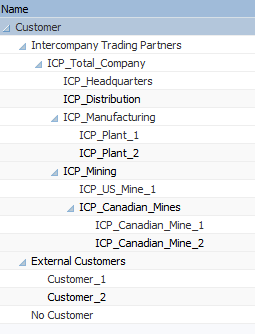
Note that all members under Intercompany Trading Partners correspond with a member from the Entity dimension exactly, but with an “ICP_” prefix.  This ASO solution will not work if there are discrepancies between Entity dimension members and the members underneath Intercompany Trading Partners.

Planning Intercompany Transactions

Intercompany transactions can occur across a variety of accounts within the Income Statement and Balance Sheet.  The simplest example is one subsidiary selling something to another subsidiary within the same company.  Let’s assume that US Mine 1 sells something to Plant 1 for $100.  Our level zero data would look something like this in PBCS:

Image_3

If we were to look at Total Sales for US_Mine_1, we would want to see $100 in sales.  But what if we wanted to see Total Sales for Total_Company?  Assuming that this was the only sale, we would want to see $0.  This is because the transaction must be eliminated at the first common ancestor between the Entity and the Intercompany Trading Partner.  Total_Company is the first common ancestor between US_Mine_1 and Plant_1.  What makes this calculation interesting is that the transaction should NOT be eliminated at ancestors before we arrive at the first common ancestor.  So we would definitely expect to see that $100 in sales to show up in the parent member Mining.

The Dreaded “E-Company”

The ins-and-outs of these transactions can get tricky, especially when mixing many transactions together with both internal and external customers.  Developers will likely have multiple sets of accounts being eliminated.  (E.g., Sales & Cost of Sales, Receivables & Payables, etc.)  Ragged hierarchies and alternate hierarchies can add additional complexity.  For this reason, it can be helpful to introduce “E-Companies” into the Entity dimension.  These are basically fake companies where we only calculate and store elimination data.

Adding E-Companies to the Entity dimension might look something like this:

Image_4

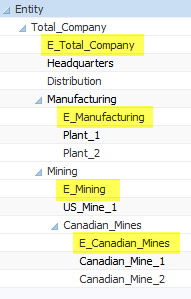
Unfortunately, E-Companies can make an Entity dimension convoluted.  If your company structure is particularly large or volatile, E-Companies can create a significant amount of maintenance.  They can also be confusing to end-users who might not understand their purpose.

** NOTE – Most intercompany elimination solutions in BSO databases require E-Companies!

ASO to the Rescue!

One of the nice things about PBCS implementations is that they often include an ASO reporting database.  In fact, some clients never consolidate their BSO databases at all, and instead, simply map their data to an ASO cube that rolls everything up on the fly – no business rule required!  And here’s where things get really awesome – in an ASO database, we can calculate intercompany eliminations without the need for E-Companies.

Here are some things to consider when designing your ASO plan type:

  • Both an Entity dimension and a Customer dimension are required.
  • The Intercompany Trading Partner hierarchy (within the Customer dimension) must match the Entity dimension exactly, with the exception of “ICP_” prefixes. This includes intermediate parents.
  • A “Data Source” dimension of some type is required to separate regular data from eliminations.
  • Account dimensions in ASO databases are automatically set to Dynamic. The Data Source dimension will also need to be dynamic to support member formulas.

The Data Source Dimension

In this solution, all of the logic associated with eliminations lives in a dimension called Data Source (or something similar).  In this dimension, all base (non-eliminated) data is loaded into a member called Amount.

Data_Source

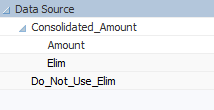
This dimension also includes a special “Do Not Use” system-only type of member.  Here, it is called Do_Not_Use_Elim.  We generally do not want users querying this member.  It’s just a temporary holding spot for storing the inverse balance for any intercompany accounts.  This member can be populated with a procedural calculation.

Image_14

It is important to note that the “Do Not Use” member should be populated in the same member combinations as the original budgeted amount, with the exception of the Data Source dimension.  Remember – this “Do Not Use” member is simply a holding spot.  Users should not query this member.

Abracadabra

The “real” magic happens in the member above called Elim.  In this member, a formula is added that filters when eliminations (stored in the “Do Not Use” member) are displayed and subsequently added to the base data.

Elim_Code

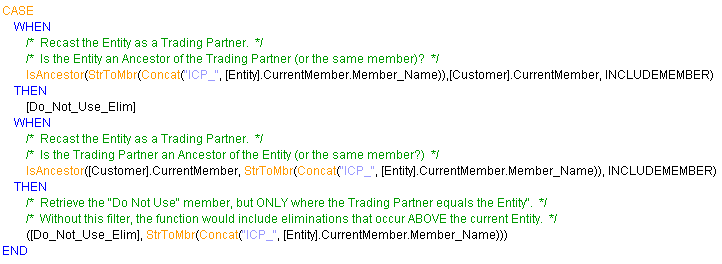
When the Elim member above rolls up to the Consolidated_Amount member, we see that the intercompany sales amount goes to zero.  In other words, it is eliminated.  (See row 15 below)

Image_16

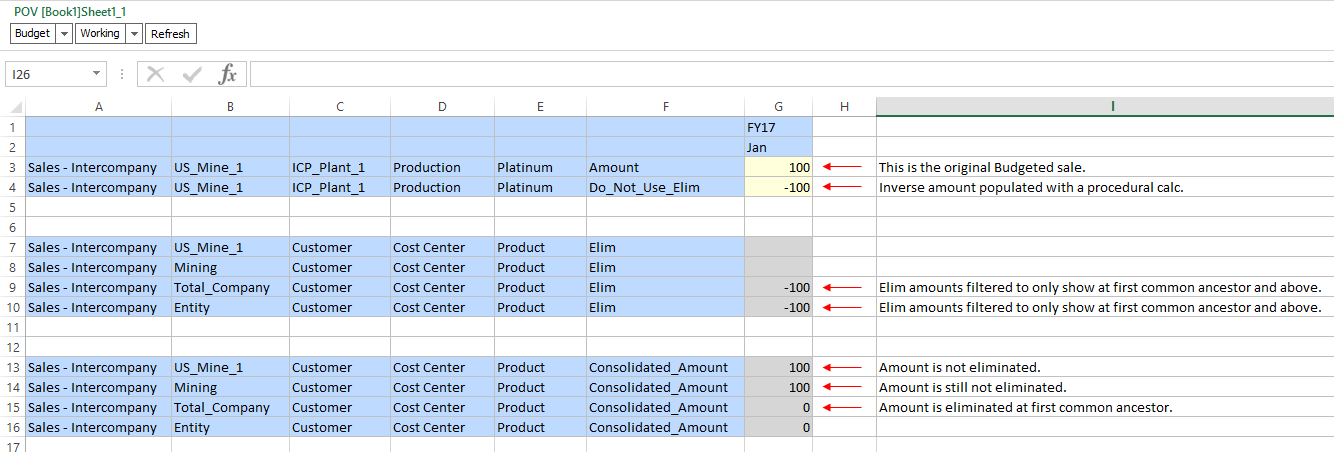
The example above shows our original sale (row 3) and the inverse amount stored in the “Do Not Use” member (row 4).  Rows 7-10 show our original Entity and its ancestors.  We can see that the eliminations are only displayed at the first common ancestor and above (row 9 – 10).  Finally, in rows 13 – 16, we see the view that most users will retrieve, using the member Consolidated_Amount.  This member takes the base data in the Amount member and layers in the data in the Elim member.  As such, we can see that the sale exists in rows 13 & 14, but is eliminated in rows 15 and above.

Wrap-Up

Like most calculations in PBCS (and Essbase in general), there are multiple options for solutions, each with its own pro’s and con’s.  This solution works well against very large databases and has the added benefit of not requiring E-Companies.  Happy Eliminating!

Getting Groovy with the EPM Cloud Migration REST API – Part 2

This post is late.  It’s embarrassingly late.  But it’s finally finished, and I hope you find it useful.

In the previous post, we discussed Oracle’s Migration API for EPM Cloud, and walked through some basic Groovy examples on:

  • Retrieving the API Version
  • Listing Files in the Inbox/Outbox
  • Uploading Files to the Inbox/Outbox
  • Downloading Files from the Inbox/Outbox

The features above are useful for tasks like loading data and metadata into an application because we often have to place files into the Inbox/Outbox before we can reference them with Data Management or as part of a job.

In Part 2 of this post, we will focus on the migration capabilities of the API.  I generally don’t automate full migrations, as they often involve a lot of communication with developers and coordination regarding the specific artifacts being moved.  However I almost always automate application backups.  Your needs may be different, so we’ll cover it all, including:

  • Listing Application Snapshots
  • Downloading Application Snapshots
  • Uploading Application Snapshots
  • Initiating an LCM Export
  • Initiating an LCM Import
  • Running the User Provisioning Report
  • Running the User Audit Report

Snapshots vs LCM Exports

Part of setting up PBCS involves defining a Maintenance Time.  During this one-hour window, the application is backed up (nightly) and an Application Snapshot is created.  The application snapshot contains everything necessary to restore the application, including data, metadata, forms, security, reports, business rules, mappings . . . you name it.  Only one Application Snapshot is maintained in the Inbox/Outbox.  It gets overwritten every night, so if you want to keep a rolling set of backups, you will likely want to automate and schedule the export of these files.

When we talk about an LCM Export, we are generally talking about a more focused artifact export, initiated by an admin.  For example, when a developer wants to migrate a specific set of artifacts from the TEST instance to PROD.  But technically speaking, an Application Snapshot is an LCM export . . . it’s just the automated nightly export that includes all artifacts and data.

Listing the Application Snapshots

We previously stated that the Inbox/Outbox only maintains the most recent Application Snapshot, so why would we bother listing these files?  There’s only one of them at any given point in time, right?  Well it turns out that when you use the Migration API to list Application Snapshots, you’re really just listing all files in the Inbox/Outbox.  In fact, you may have noticed that the listFiles() function in the Groovy Common Helper Functions uses the URL for “/application snapshots”.

It’s interesting to note that the files in the Inbox/Outbox are classified as either “LCM” or “External”.  LCM files include Application Snapshots and anything exported using LCM.  But curiously, this property also applies to internal Inbox/Outbox directories.  “External” files make up the remaining contents of the Inbox/Outbox.  These are usually files uploaded for data and metadata.

We can see this LCM vs External designation by adding the code circled in red below to the listFiles() function.

Image_16

If we then run the listFiles() function, we should see the current Artifact Snapshot (among any other files in the Inbox/Outbox:

Image_17

Downloading Application Snapshots

Downloading Application Snapshots is one of the more useful aspects of the Migration API, as most clients want to keep a rolling set of files over a given time period.  Because the Application Snapshot in the Inbox/Outbox gets overwritten every night, it’s important to download this file in an automated and scheduled manner.

Downloading an application snapshot is just like downloading any other file, however there are a couple of “gotchas”.  While all of the Migration API documentation refers to the “Application Snapshot”, the actual file that gets produced nightly in the Inbox/Outbox is called the “Artifact Snapshot”.

Another unusual fact about this file is that it has no file extension, even though it is a .zip file.  If you want to easily browse the contents of this file, you’ll need to add the .zip file extension once downloaded.

Other than those two items, the Application/Artifact Snapshot can be downloaded using the downloadFile() function in the Groovy Common Helper Functions.  Please see the previous post here with some useful updates to this function.

Image_17a

Uploading Application Snapshots

Uploading an application snapshot is similar to uploading any other file to the Inbox/Outbox.  With that said, I have not been successful in uploading a previously downloaded Artifact Snapshot without first updating the file name.  This is because the nightly “Artifact Snapshot” file has a space in the file name, and has no file extension.  Remove the space and add a “.zip” file extension and everything works as expected.  But I have to ask, why would Oracle produce a download file that cannot be uploaded in its original state?  It may have something to do with the fact that Oracle can’t be sure which operating system exists on the target file system, and different operating systems use different file compression programs.

Note the different file name below:

Image_20

Regardless of the filename, the Migration API will recognize that the file being uploaded is an Artifact Snapshot (as opposed to any other file being uploaded to the Inbox/Outbox), however the file must have a “.zip” file extension.

Initiating an LCM Export

LCM Exports initiated via the Migration API aren’t especially intuitive, however once you know how they work, they’re pretty flexible.  I’ll explain . . . in order to execute an LCM export using the Migration REST API, users must first execute a successful export via the PBCS interface.  Once that has been done, developers can re-execute that same export using the API.

My initial reaction to this approach was concern.  What if I setup a process in the PBCS user interface that archives all of my forms?  Will that export contain a hard-coded list of forms, missing any future artifacts I might add to the application?  The answer is no (and yes, depending on how you specify your artifacts).  If I tell LCM to export all of my forms (without selecting any individual forms), then any new forms added at a later date will get picked up in future exports initiated using the API.  If I specify specific forms in the initial selection using the PBCS user interface, then only those specific forms will get exported in the future when using the API.

Let’s look at an example, but before we get started, you will need to add the function exportSnapshot() from the Groovy Common Helper Functions to your script.  Next we will log into PBCS, and select the Application icon.  Once expanded, select the Migration icon.  (Your icons may vary somewhat if your environment hasn’t been updated.)

Image_21

Navigate through the Artifact Categories, and select the objects you want to export.  Remember that selecting an artifact category will allow future exports to capture newly added artifacts, while selecting specific artifacts within categories will limit future extracts to those just those specific artifacts.

Select the Export button and provide an export name.  I selected “Planning” and named my export “Full_Planning”.  Assuming that I have copied the exportSnapshot() function from the Common Helper Functions for Groovy, I only need a single line of code to re-execute an LCM export:

Image_22

At this point, you should have a fresh LCM export sitting in the Inbox/Outbox.

Initiating an LCM Import

I wouldn’t typically automate an LCM import into an application, however this could conceivably be useful if you’re refreshing a number of testing or training environments on a regular basis.

To import a snapshot using the Migration API, first copy the importSnapshot() function from the Common Helper Functions for Groovy.  Then add the line highlighted below and run the script.

Image_23

A quick check of the Migration Status Report will confirm the success of your LCM import.

Image_24

Running the User Provisioning Report

Running user provisioning reports in an automated manner can be useful for organizations with rigorous IT audit and documentation requirements.  To run this report using the Migration API, copy the waitForCompletion() function from the Common Helper Functions.  You will also need to copy the provisionReport() function from the chapter “User Provisioning Report”.  (This function isn’t currently listed in the Common Helper Functions for Groovy.)

Then add the following line to your script:

Image_25

It is important to note that the User Provisioning Report will be placed into the Inbox/Outbox.  From there it can be downloaded automatically with the downLoadFile() function.

The User Provisioning Report itself will look something like this:

Image_26

Running the User Audit Report

While the User Provisioning Report will highlight all of the roles assigned to a give user (including the group through which they inherited a role), the User Audit Report shows when the user accessed the application and their associated IP address.  This report doesn’t address specific activities undertaken within the application, but rather the fact that the app was accessed.

To run the User Audit Report using the REST API, you will need to copy the userAuditReport() function from the chapter “User Audit Report”.  (This function isn’t currently listed in the Common Helper Functions for Groovy.)

Then add the following line to your script:

Image_27

Like the User Provisioning Report, the User Audit Report will be placed into the Inbox/Outbox.  From there it can be downloaded automatically with the downLoadFile() function.

The User Provisioning Report itself will look something like this:

Image_28

You may have noticed that both report functions allow the specification of a report type (either “provisionreport” or “userauditreport”).  The documentation suggests that the “provisionReport()” function goes with the “provisionreport” parameter, and the “userAuditReport()” function goes with the “userauditreport” parameter.  This makes sense, but can you run an audit report with the “provisionReport()” function and vice versa?  Here’s what I noted:

Image_29

Wrap-up

So there you have it!  You can now automate backups, migrations and usage reports using the REST API’s.


Getting Groovy with the EPM Cloud Migration REST API – Part 1

Oracle provides specific REST APIs for many of its cloud offerings, however one API in particular is useful for multiple cloud products – the Migration API.  This API is sometimes referred to as the “LCM” API or the “interop” API.  Regardless of the name, this is the API that provides Lifecycle Management functionality for EPM Cloud products.

If you’ve never worked with any of Oracle’s EPM REST APIs, have a look at my previous post here on the PBCS REST API.  This will give you some context and background on the subject.  We will be using Groovy for all examples.  Steps for installing Groovy can be found within this post.

Using the Migration API, developers can perform the following tasks:

  • Get API Versions and Details
  • List Files in the Inbox/Outbox
  • Upload Files to the Inbox/Outbox
  • Download Files from the Inbox/Outbox
  • Delete Files from the Inbox/Outbox
  • List Available Services
  • Restart a Service Instance
  • Reset a Service Instance
  • Upload/Download Application Snapshots
  • Initiate LCM Imports & Exports
  • Send Feedback Reports to Oracle
  • Generate a User Provisioning Report
  • Generate a User Audit Report

Some of the tasks above are not great candidates for automation.  For example, it would be highly unusual to reset your service instance in an automated manner.  I also wouldn’t recommend sending Oracle feedback in any automated fashion.  They may have some “feedback” for you . . .  with that said, there are some extremely useful features of the Migration API, and we will cover them below.

A Word About the Common Helper Functions . . .

As noted in previous posts, the Common Helper Functions offer a significant head start in automating an EPM environment.  This post will reference many of these functions while illustrating how to put them together into a cohesive script.

** NOTE – Each section below has a link where readers may download the code samples.

Getting Started

After opening the Groovy Console, we will need to import some classes from the groovy.json package.  If you’re unfamiliar with JSON, it’s basically a format for passing arrays commonly used in REST APIs.  The code below will import the appropriate package (no need to download any additional jar files – these come with Groovy):

Image_1

Next, we must define variables for our EPM environment and authentication.  If you’ve read my previous post on the PBCS REST API, these should look familiar.  You will need to update these with your instance information and credentials.

Image_2

First Things First – Determine the API Version

It’s important to note that the API versions for the various EPM products can differ.  The current version for the PBCS API is “V3”, however the Migration API version is “11.1.2.3.600”.  Several functions require the API version, and they will not work if the wrong API version is passed as a parameter.

To get the current Migration API version, we will need the following functions from the Common Helper Functions:

  • getLCMVersions()
  • executeRequest()
  • fetchResponse()
  • fetchJobStatusFromResponse()

Copy and paste these functions into your Groovy script below the EPM Instance Variables, then insert a line to call the getLCMVersions() function.

Image_3

At this point, your code should look something like this.

Run your script and review the results in the Groovy Console output window:

Image_4

At this point, it’s a good idea to define a variable apiVersion, and assign that variable a value within the getLCMVersions() function.

Listing the Files in the Inbox/Outbox

Now that we have the correct API version, we can perform some of the more interesting functions of the Migration API.  For example, we can list the contents of the Inbox/Outbox.  To do this, add the listFiles() function from the Common Helper Functions to your Groovy script.  Then call the function as follows:

Image_5

Run the script and review the list of files in the Groovy Console output window.  At this point, your code should look something like this.

Uploading Files to the Inbox/Outbox

To add files to the Inbox/Outbox, we need to copy the following four functions from the Common Helper Functions into our Groovy script:

  • fetchPingUrlFromResponse()
  • getJobStatus()
  • sendRequestToRest()
  • uploadFile()

Note that the sendRequestToRest() function leverages a third-party library called JSON-lib.  To use this library, download the java-json.jar file from http://www.java2s.com/Code/JarDownload/java/java-json.jar.zip and unzip it into the C:\Program Files (x86)\Groovy\Groovy-2.4.6\lib directory.  Add the following line (highlighted in yellow) to the top of your Groovy script and you’re ready to go!

Image_6

Out of the box, the functions above will get the job done, however uploading files from a specific directory produces some undesirable behavior.  For example, if we have a local file called C:\Temp\Test_File.txt, and we upload that file, here’s what shows up in the Inbox/Outbox:

Image_7

Notice that the file path gets baked into the file name.  We didn’t want to upload a file called “C:\Temp\Test_File.txt”.  We wanted a file called “Test_File.txt”, and it just happened to be originally located in the C:\Temp directory (which is irrelevant once the file is uploaded).

We can rectify this situation by modifying the uploadFile() function, separating parameters for the directory and file name.  Modify the uploadFile() function by adding the sections highlighted in yellow below:

Image_8

Next, call the uploadFile() function with two separate parameters for the directory and file name.  Note the double-slashes below.

Image_9

Running the script now uploads the file to the Inbox/Outbox with the correct file name.

Image_10

At this point, your code should look something like this.

Downloading Files from the Inbox/Outbox

To download files from the Inbox/Outbox, we need to copy the following function from the Common Helper Functions into our Groovy script:

  • downloadFile()

Developers may find that this function benefits from a couple of key changes.  The downloadFile() function doesn’t allow developers to specify a target directory for the downloaded file.  By adding a parameter for the directory, and updating the saveFilePath, we can specify the target directory.  Modify the function as follows (note the sections highlighted in yellow):

Image_11

Image_12

After successfully running the function, you may notice that Groovy doesn’t “release” the downloaded file.  Trying to delete the file in Windows File Explorer results in the following error:

Image_13

The only way to get past this error is to close the Groovy console completely.  Upon inspection, it looks like the code opens an output stream, but never closes it.  This is easily rectified by inserting the line below (highlighted in yellow) into the function:

Image_14

After making the changes above, developers should be able to download files from the Inbox/Outbox to any local directory.

Test the downloadFile() function by calling it at the end of the Groovy script.  Note the two parameters used by the function.

Image_15

If you’ve been following along this whole time, that’s awesome!  Your code should look something like this.

Bed Time . . .

In Part 2 of this post we will cover the remaining aspects of the Migration API . . . Artifact Snapshots, LCM and User Reports.  Check back soon – I should have it posted by the end of next week!

One More Thing

I’m speaking at OpenWorld this year!  My presentation on Essbase Hybrid Aggregation Mode will be in Moscone South – Room 303 on Sunday 9/18 at 1pm.