Uncategorized

PBCS Pro Tip: Manage Multiple Test Accounts with One Gmail Address

During the testing phase of most Planning implementations, developers need to create test user accounts.  I typically create at least one test user for each security group so I can verify that the correct access has been assigned.  With an on-premises Hyperion Planning implementation, this is easy – simply create user ID’s in the Shared Services native directory.  With PBCS, creating bulk test ID’s can be difficult, as each user ID requires a unique e-mail address.  If you need 50 test users, should you create 50 fake/temporary e-mail accounts?  Luckily the answer is no.

The Easy Way . . .

Gmail has a clever feature that allows developers to use the same address (almost) for all test user e-mail accounts, and it involves the “+” sign.  Specifically, the plus sign and everything to the right of a “+” in a Gmail e-mail address is ignored.  Here’s an example.  Let’s say I want to create one test account per security group, and I have the following groups:

  • Sales_Read
  • Sales_Write
  • Marketing_Read
  • Marketing_Write
  • Executive_Read
  • Executive_Write

I created a free Gmail account with the e-mail address pbcstest@gmail.com.  If I try to use this same e-mail address for all six of my PBCS test accounts, I’ll get an error.  Each account requires a unique e-mail address.  However I want to manage all of my test accounts from a single e-mail address.  To do this, I need to use a “+” sign in the e-mail addresses of my test users.

Here’s an example.  For the Sales_Read group, I might create an account called Test_Sales_Read.  When I assign an e-mail address to this account, I’ll use pbcstest+sales_read@gmail.com.  Gmail will ignore the plus sign and the text to the right of the “+”.  All confirmation e-mails will be send directly to the pbcstest@gmail.com account.  I can create as many users like this as I want, as long as the text to the right of the “+” sign is unique for each account. PBCS will treat the e-mail addresses as if they are unique.  My six accounts above might look something like this:

User_Table

When Oracle Cloud sends the user ID confirmation messages with temporary passwords, they will all be delivered to pbcstest@gmail.com.

On a Personal Note . . .

This feature isn’t just useful for PBCS.  Imagine creating rules within Outlook that route your personal e-mails to folders based upon the following:

  • myaccount+netflix@gmail.com
  • myaccount+bankstuff@gmail.com
  • myaccount+amazon@gmail.com
  • myaccount+travel@gmail.com
  • myaccount+odtug@gmail.com

Let your e-mail OCD run wild!  (and simplify the creation of PBCS test accounts)

Essbase Pro Tip: Compare Outlines with Groovy

I’ve had a recurring challenge at several of my more recent clients. They have had lots of apps, lots of environments, and lots of developers working on different initiatives at the same time. So when it came time to move a cube from DEV to TEST, or TEST to PROD, I was always a bit nervous. I wanted to fully understand the differences between my outlines across environments before I migrated anything, so I set out to build an Outline Comparison utility.

Reinventing the Wheel . . .

I am, of course, not the first person to attack this challenge. Terry Ledet at US-Analytics has a very sophisticated and fast utility that leverages a relational database. I’m hoping he’ll post a blog about his approach soon. Doug Bliss has a solution that appears to leverage the VB API. Unfortunately, this API is no longer supported as of Essbase 11.1.2.4. Evgeniy Rasyuk has a utility written with the Java API, however it requires a commercial license. Other people have used a combination of the Applied OLAP Outline Extractor and file comparison utilities. While useful, this approach produces less-than-readable results when there are a variety of differences across cubes.

In the end, I wanted something that met my specific needs and would allow others to leverage my code. I wanted a solution that had:

  1. Open Source Code – use it and modify it however you want
  2. No Cost – free for everyone
  3. Straightforward Results – simply list the differences between two outlines
  4. Simple Architecture – no relational database required

Note – Readers may download the latest version of the Outline Comparison utility here.

I am Not a Java Developer . . .

The Java API is clearly a part of Oracle’s path forward for Essbase, and this makes it a logical choice for developing a utility of this sort. However, I’m not a Java developer. But I was lucky enough to co-edit Cameron Lackpour’s first book Developing Essbase Applications. And in this book, Joe Aultman wrote a chapter on automating common Essbase activities with Groovy. Now, I’ve always had a lot of respect for Joe’s Essbase knowledge. But to be completely honest, I thought his love of Groovy was a bit . . . eccentric. After all, how many people are actually going to write Java API code to automate Essbase tasks? Well, it turns out I was wrong, because Groovy is really easy to use and very powerful when combined with the Essbase Java API. Groovy provided the “training wheels” I needed to build a Java-based Outline Comparison utility.

What is Groovy?

Groovy is a programming language that leverages the Java platform and takes a lot of the hard work out of developing Java apps. While I’m probably oversimplifying, it’s basically a “crutch” for Java. Rather than go into the specifics of Groovy, I’d encourage you to read Joe’s chapter in Developing Essbase Applications. I’m going to jump into the good stuff – let’s build something.

Download and Install Groovy

Click here to navigate to the Groovy distributions. For Windows, select the “Windows Installer”, circled in green below.

00_Download

Download and launch the installer.

Select your preferred language.

01_Language

Select OK.

02_Setup

Select Next.

03_Agree

Select I Agree.

04_Options

Perform a Full installation. Select optional components. (I selected them all.)

05_Location

Tell Groovy where to install. Select Next.

06_Shortcuts

Select Install.

Groovy will begin installing.

08_Install_Complete

Look for the word Completed. Select Next.

09_Env_Variables

Configure Environment Variables and Path. Select Next.

10_File_Assoc

Configure File Associations. Select Next.

11_Complete

Select Finish.

In your applications, find the shortcut to Start GroovyConsole. Launch Groovy with this shortcut. A blank GroovyConsole will be displayed.

13_Groovy_Console

The Groovy Console

The Groovy console is pretty straightforward. To make sure things are working after the install, we’ll write a simple program below that outputs the text “Is this thing on?”.

Console_Features

Enter the text println “Is this thing on?” in the white script section. Press the Execute Script button. If the text “Is this thing on?” was printed in the yellow output section, you’re ready to start building your Outline Compare Utility.


Developing the Outline Compare Utility

The basic steps for building an Outline Compare Utility are as follows:

  1. Import the appropriate Essbase API files
  2. Read variables from a config file
  3. Define output file
  4. Connect to Cube #1 and Cube #2
  5. Open the Essbase Outlines
  6. Loop through all members in both cubes
    1. For Members in Cube #1 . . . Make sure they exist in Cube #2
      1. For Members in Both Cubes . . . Make sure properties are the same
      2. For Members in Both Cubes . . . Make sure member order is the same
    2. For Members in Cube #2 . . . Make sure they exist in Cube #1
  7. Close and disconnect

Importing the Essbase API Files

To take advantage of the Essbase Java API when using Groovy, we need to help Groovy find the appropriate jar files. These files will not exist on your computer unless you have installed the Essbase client software.

The location of the Essbase Java API jar files will vary depending on your installation options. On my laptop, they were located in C:\Oracle\Middleware\EPMSystem11R1\common\EssbaseJavaAPI\11.1.2.0\lib.

Copy the files below into the C:\Program Files (x86)\Groovy\Groovy-2.4.5\lib directory.

  • ess_es_server.jar
  • ess_japi.jar
  • ess_maxl

Please note – there are multiple ways to handle external jar files with Groovy. This is one of several methods.

Now we can import the jar files into our Groovy script with the code below:

15_Import_JAR_Files

Create a directory for your program, and save the file as OtlCompare.groovy.  (Place your properties file in the same directory.)

The Config File

I didn’t want to modify my code whenever I wanted to compare a new set of cubes. But I wasn’t ready to build a GUI to prompt users for login information, cube names, etc. This is something I may add at a later date. Instead, I decided to store this information in a config file and have the program read that file. Luckily, Groovy has a utility called ConfigSlurper() that reads config files. I simply created the file with the variables I wanted, defined the file and told ConfigSlurper() to go get my variables.

My Config file looks like this:

14_Config_File

Please note that I placed all of the files related to this application in the logDir referenced above, including the Groovy source code, properties, and output. You will need to modify this location.

Next, I updated my Groovy script to read the config file as follows:

15_Read_Config_Info

On line 12 above, we see the config file being defined. On line 13, ConfigSlurper parses the file. After that, we can reference any of the variables in the config file by prefixing the variable name with “config.”. We can see this on line 16, where we reference config.logDir. logDir was the location for the log file that we defined in our config file. This really highlights the beauty of Groovy. With two lines of code, we processed an entire config file, storing 13 separate variables.

On line 19, we create the log file. We will append to it in future steps. Starting on line 21, we write the current time to the log file.

Note – appending “\t” inserts a tab into a text file.

Note – appending “\r\n” inserts a carriage return into a text file.

Running this script should produce output similar to the image below. It should create a new log file whose location is defined by your config file:

16_Write_to_Logfile

The log file should look like this:

17_Logfile

Note that we are sending the output to both the console (using println statements) and the log file, (using logfile.append statements).

Connect to Essbase and Open Outlines

The lines below initialize the Essbase Java API and connect to Essbase. Note the use of variables defined in the config file. Any variable prefixed with “config.” is defined in the config file.

18_Connect_to_Cubes

Now that the two outlines are open, we can begin looping through the member names comparing properties.

Looping Through Members

To loop through the members in the outlines, we will create a function called checkMembers. What makes this function interesting is that it is recursive – it calls itself. The function starts by looping through the dimensions. It then loops through the children of each member until there are no more members to process, working its way through the entire tree.

We first loop through Outline #1, checking to see if each member exists in Outline #2. If the member exists in both outlines, we check to make sure the properties are the same. Anytime we run across a mismatch or missing member, we make a note in the log.

Next we loop through the members in Outline #2, checking to see if each member exists in Outline #1. But this time, if the member exists in both outlines, we don’t bother checking the properties, because we would have already done this in the first loop. Instead we’re simply looking for extra members that exist in Outline #2, but not in Outline #1. The function has a parameter that allows us to skip the member property check.

There is a significant amount of code in this section. Rather than list all of the code, readers can download the entire OtlCompare.groovy file here.

Close Outlines and Log Off

After we have looped through the members, we need to close the outlines and log off from Essbase.

19_Close_Logoff

In this example, I also write the ending time to the log and calculate the elapsed time for the procedure.

Final Thoughts

I’m really happy with the results of this script. It simplifies the process of comparing outlines, making it faster and more accurate. With that said, there’s always room for improvement. The script works well against small and medium sized outlines. But when I ran it against a pair of outlines with 100,000+ members each, it took almost 30 minutes. I’m sure I can make it faster. I’d also like to add support for checking all alias tables, attribute dimensions, non-unique member outlines, etc. Lastly, when the script flags members as missing, it then flags other members as “out of order”, when they really aren’t in the wrong order.  Their “previous member” or “next member” simply isn’t there. I should be able to clean this up.

In the end, it does exactly what I needed it to do – identify differences between outlines. And it does so in a tab-delimited file that can easily be sorted and filtered in Excel.

20_Results_in_Excel

EPM Pro Tip: Build & Maintain Security in Excel

Agatha Christie once argued against the notion that necessity is the mother of invention. She said, “Invention, in my opinion, arises directly from idleness, possibly also from laziness – to save oneself trouble”. This is the guiding principle I follow when designing and building security models for Hyperion Planning and Essbase. So how can a bit of laziness take the “trouble” out of EPM security? By leveraging Excel and letting formulas do the heavy lifting. This is an approach I’ve been using for over a decade, and I’m certain I’m not the only one. Although some of the tools have changed (think LCM), the general approach has been the same.

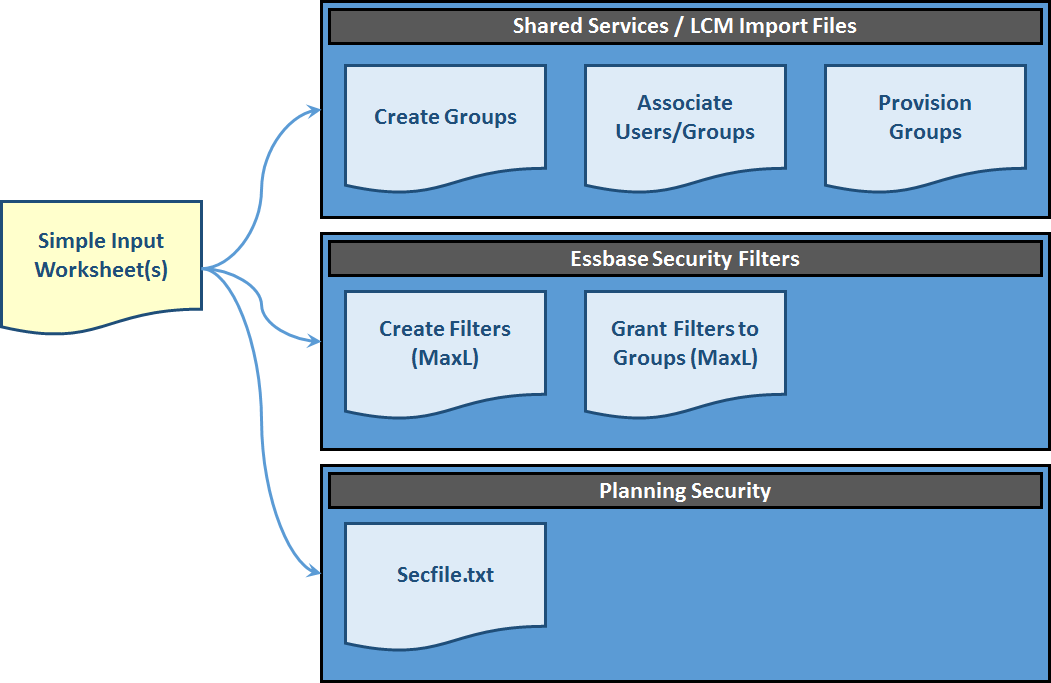
Step 1: Create a user-friendly, table-like input worksheet where administrators can enter security information.

Step 2: Create separate “export” worksheets for each of the basic components of EPM security (Shared Services, Essbase, Planning, etc.).

Step 3: Take the content from the input worksheet(s) and link it to the “export” worksheets with formulas, placing everything into the correct format.

Step 4: Import security & check for errors.

Process

Show & Tell

Let’s look at a simple example. Keep in mind that based upon your particular requirements, this approach can have a lot of variations. For example, you may not be able to create your own groups, because your organization prefers groups to be maintained in Active Directory. In our example, we’ll use native Shared Services users and groups. The same principles apply . . . you’ll just have to tweak things a bit.

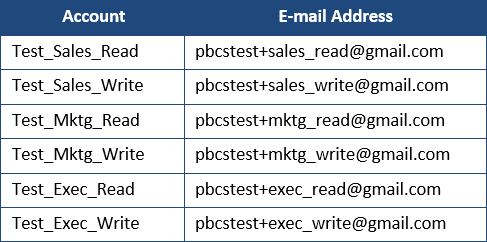
In our example, our administrator has to maintain security in a Hyperion Planning application and a native Essbase reporting cube. The applications both have the same users, and they have similar security requirements. We’ll use my Starbucks Hyperion Planning demo. It contains all of the global Starbucks, Teavana and Seattle’s Best Coffee locations. (The locations are real, but everything else is made up . . .) We’ll create groups for the 12 main countries/regions in which Starbucks operates.

9-29-2015 9-00-25 PM

In the examples below, an Excel workbook will be highlighted.  The full workbook can be downloaded here.

 The Simple Input Worksheet

In our “simple input worksheet”, we will need some basic information. We’ll need to know:

  • What are the groups with access to the EPM products?
  • What members can these groups access?
  • What is the level of access?
  • Who is in the groups?

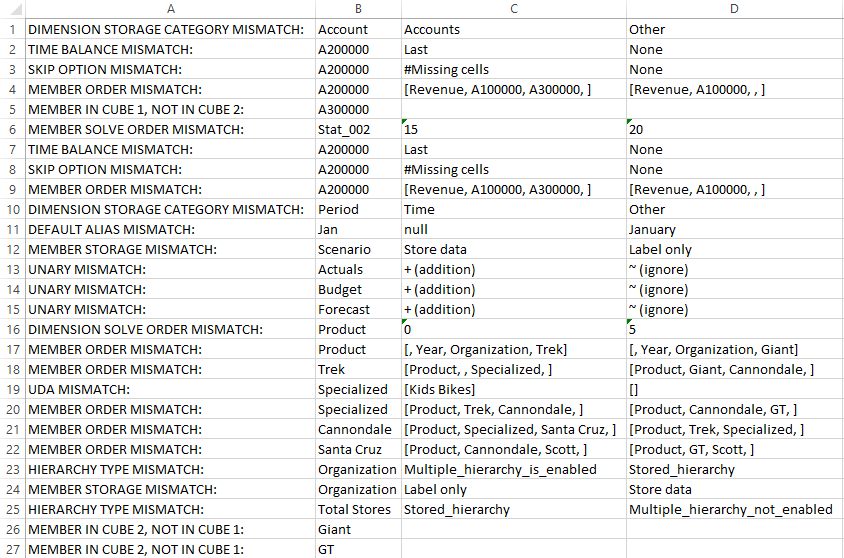
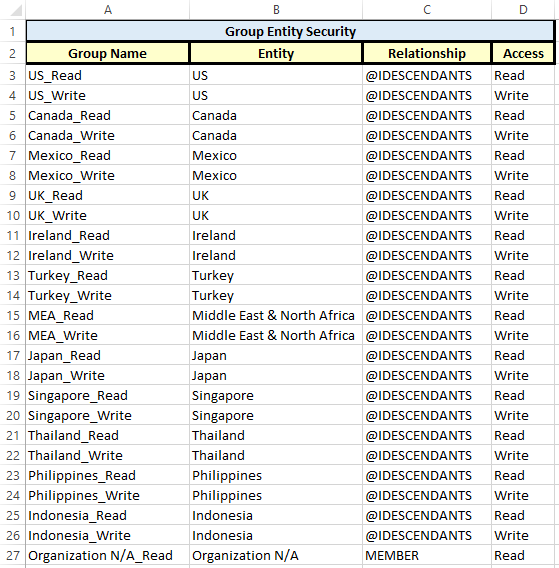
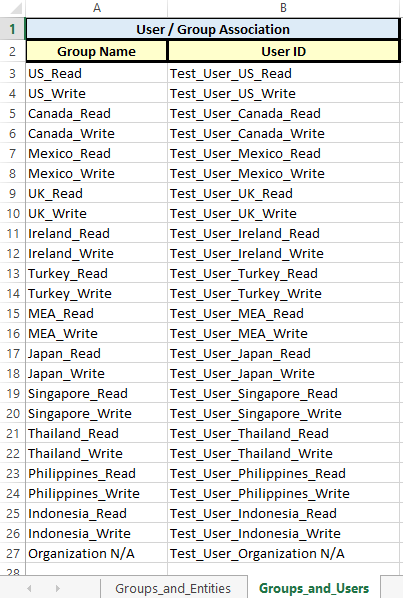
Here is what our simple input worksheets look like. In our example, we will create 24 groups (one read and one write for each country/region). We will also add one test user to each group. We will assume that all groups have access to both Planning and Essbase.

What are my groups and what can they access?

9-30-2015 12-48-33 AM

Who is in my groups?

9-29-2015 9-22-59 PM

The Lazy Bit

Now that we have collected the basic information we need, we can begin to create our outputs. These are the files that we will import into Shared Services, Essbase and Planning to actually build our EPM security.

We’ll start by creating an LCM import file that creates our groups. However, we may not know how to format this file. How do we get around this? Follow these steps:

  • Manually create one native group in Shared Services.
  • Manually add a user to the group.
  • Manually provision the group.

I provisioned my sample group like this:

Provision

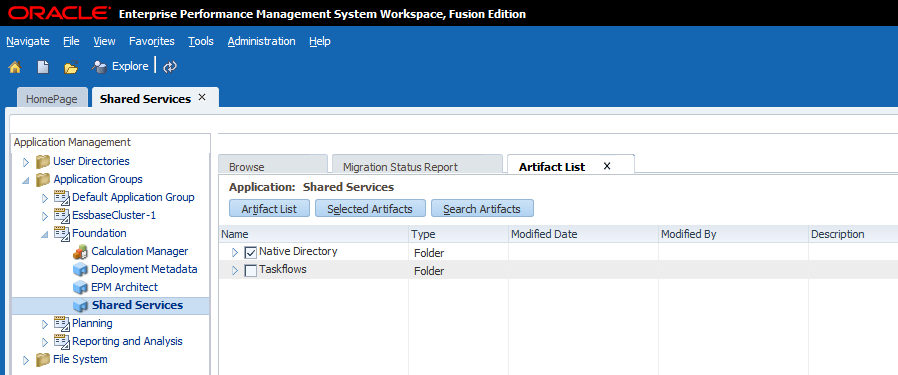
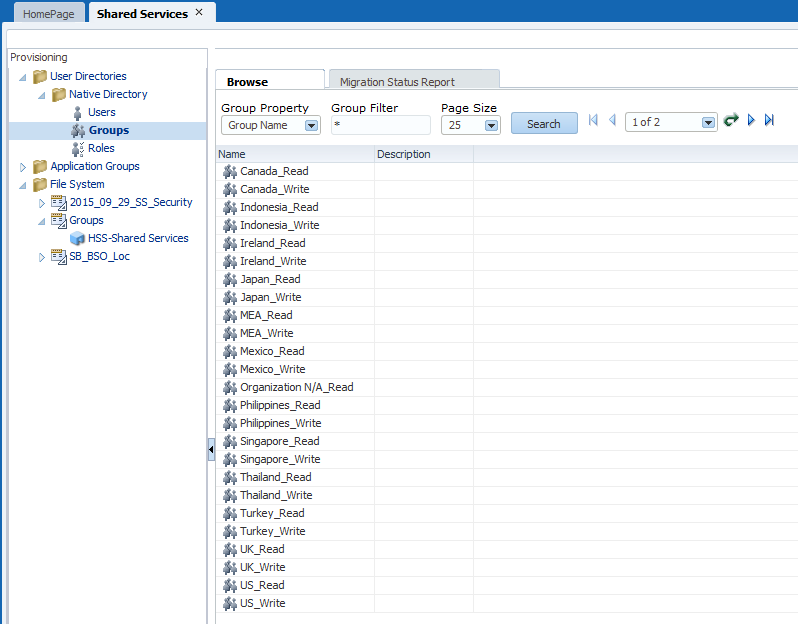
Next we need to export the security we just created manually in Shared Services. This will give us an idea of what the Shared Services import files should look like.

Here’s what we will export from Shared Services in LCM:

9-29-2015 10-03-25 PM

Note that even groups and users that were created in Active Directory will be exported when the “Native Directory” above is selected, assuming they have been provisioned.

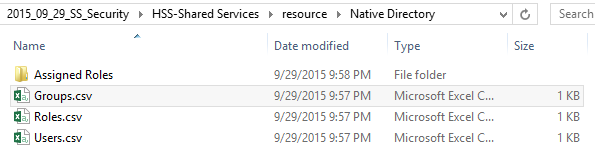
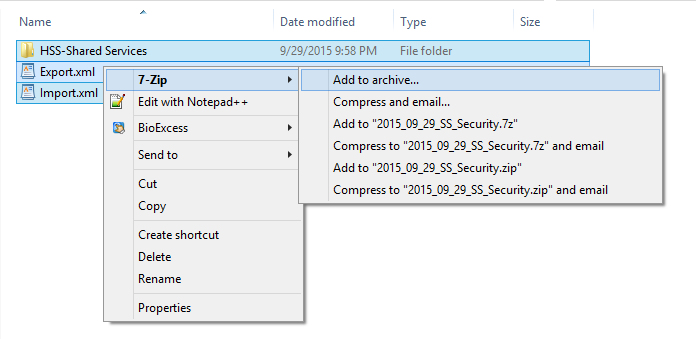
Select the Export button. Once the export is complete, browse to the file under the File System. Right-click on the file and select Download. Save the file to your desktop and unzip it. The following file structure will be available:

9-29-2015 10-12-00 PM

If we edit the Groups.csv file, we can immediately see the format of the file we need to create that will ultimately be used to create the new native groups in Shared Services. In this file we see the group that was previously created manually and we see the test user that was assigned to the group.

9-29-2015 10-14-08 PM

** Note – Leave the internal_id above blank when creating the new import file.

** Note – If you’re using Active Directory users or groups, your providers will be slightly different.

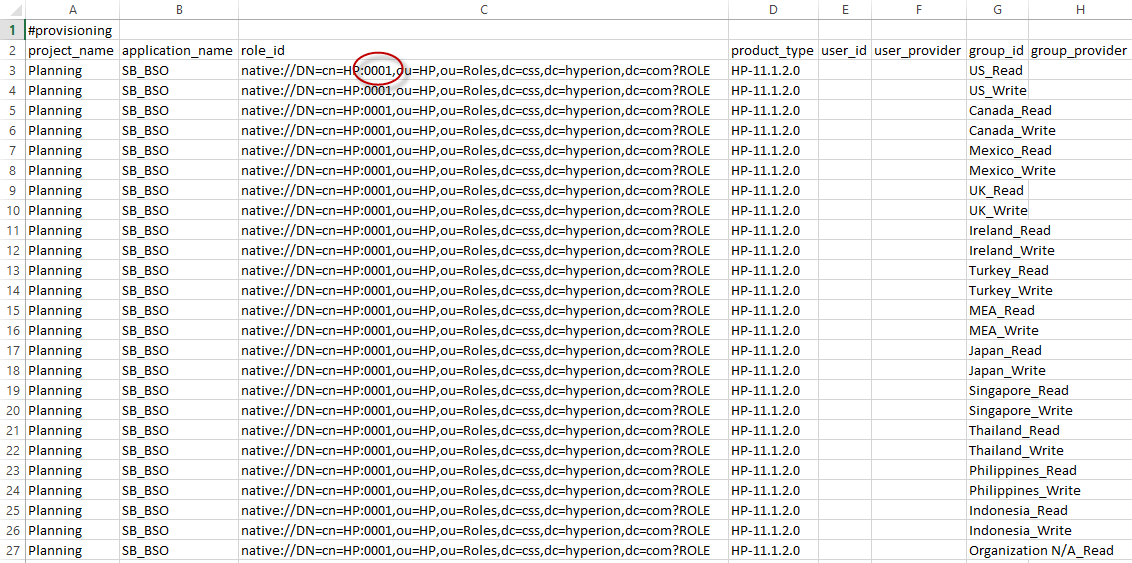
Create the Shared Services Group Import File

Using the same basic format as our exported Groups.csv file, we can create a new file (within our EPM Security Workbook). This file will create our groups and associate our users with the groups.

It’s important to note that many of the cells below are populated with simple formulas that reference the Groups_and_Entities or the Groups_and_Users worksheet. Note the formula circled below.

9-29-2015 11-01-23 PM

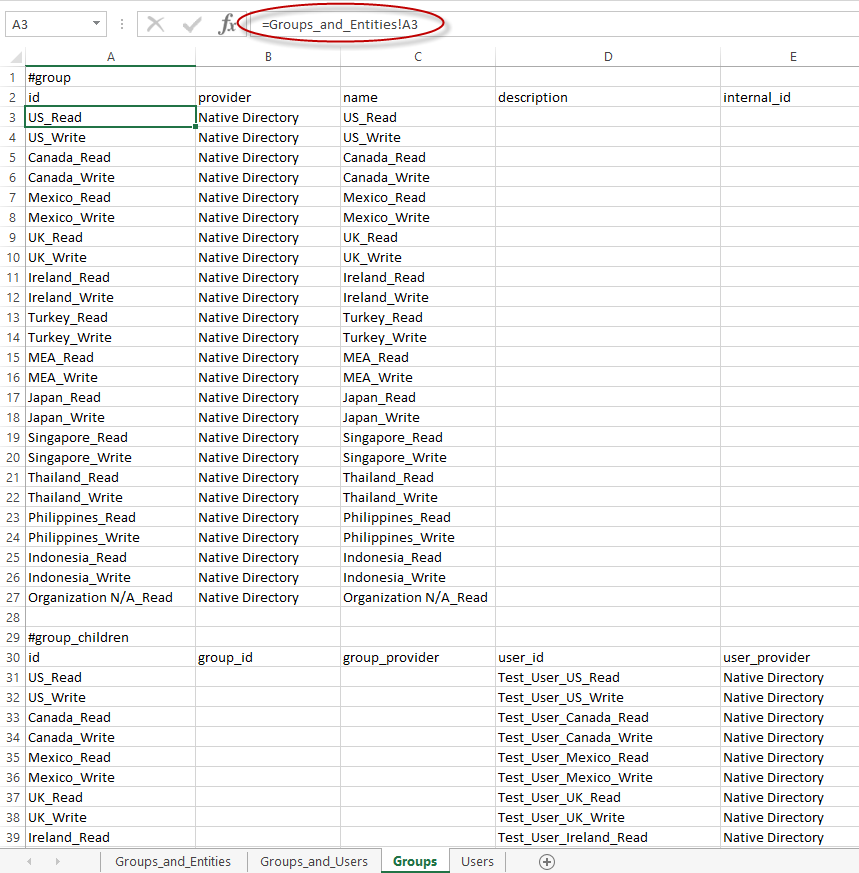
This file can either be saved as the Groups.csv file (in the previously unzipped folder structure), or the administrator can copy and paste the results into the Groups.csv file (the one previously exported from Shared Services). Then, simply zip the files back up (starting at the top of the LCM file structure).

9-29-2015 11-05-44 PM

Upload and Import the Zipped Shared Services Files

From within Shared Services, right-click on the File System. Select Upload.

9-29-2015 11-08-05 PM

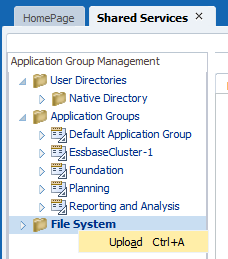
Browse to the zipped Shared Services files. Select Finish, then OK.

Next, expand the file within the Shared Services File System. Select the Groups.

9-29-2015 11-11-55 PM

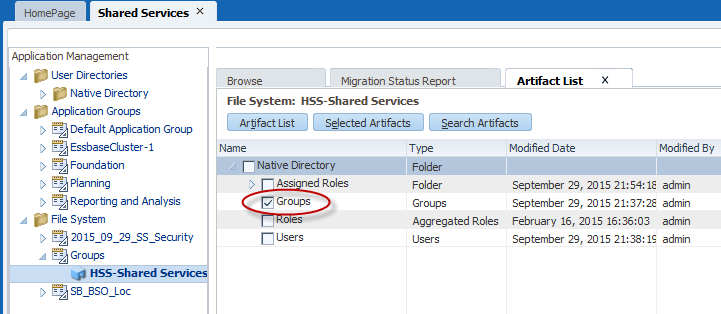
Select Import. Ensure that the groups were created successfully and that the users were added as expected.

9-29-2015 11-16-52 PM

Provision the Groups

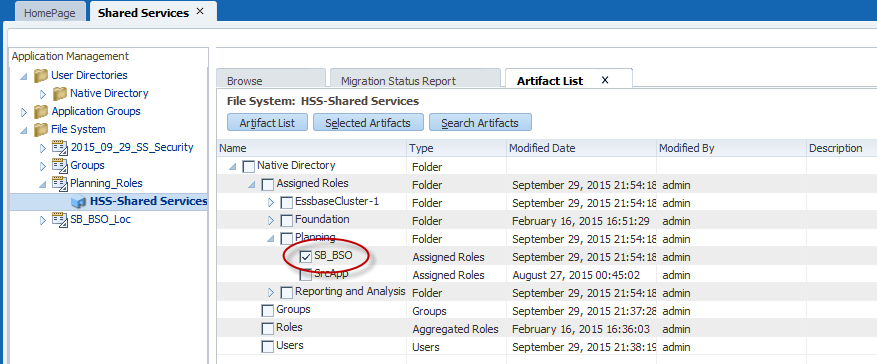
Now that the groups are imported and the users have been added to the groups, it’s time to provision the groups. Navigate to the Assigned Roles directory in the previously exported LCM file.

2015_09_29_SS_Security\HSS-Shared Services\resource\Native Directory\Assigned Roles\Planning

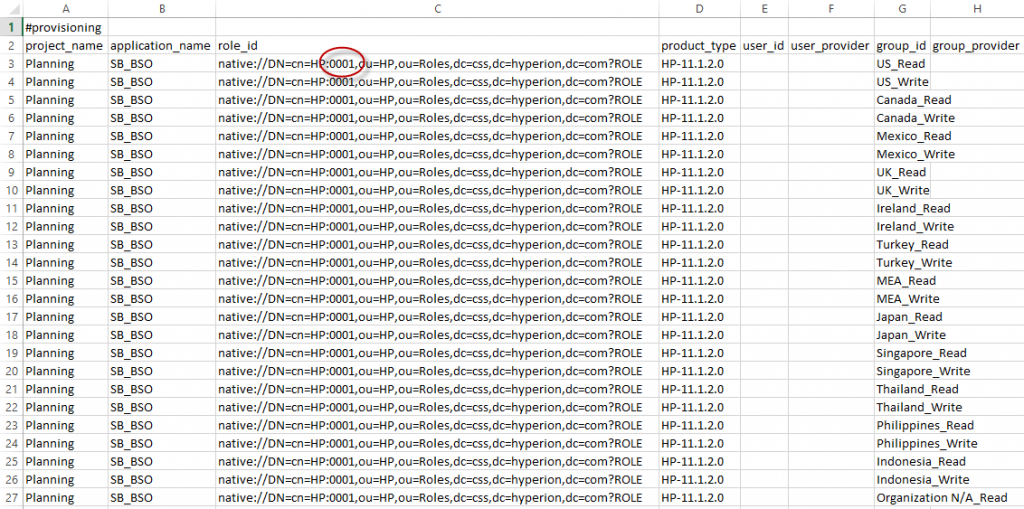
Modify the Planning application file to provision each of your groups, again, using formulas to reference the groups in your Groups_and_Entities tab. Pay special attention to the role numbers. (This is why we create a Group and User manually first, and then export the file. This way, we can copy items such as the role number – something we otherwise would probably not know.)

9-29-2015 11-24-10 PM

Re-zip the Shared Services LCM files, upload the file and import the Planning Assigned Roles.

9-29-2015 11-29-49 PM

At this point, all of the groups should be provisioned as Planners.

9-29-2015 11-34-37 PM

Repeat this process and provision the groups for Essbase and FR (based upon the files previously exported containing our manually created test group). Groups must be provisioned in Shared Services for Essbase and Planning before application-specific security can be applied.

Create Essbase Filters and Grant Them to Groups

Woo hoo! At this point, we’re finished with Shared Services and LCM. All of the groups have been created. Users have been added to the groups. All of the groups have been provisioned. And all of this has been done by importing files built based upon simple formulas.

Next we need to create our Essbase filters. For this, we will use Excel formulas to craft MaxL statements. We can paste these statements directly from Excel into the MaxL command prompt.

Let’s start with the basic MaxL that we want in our Security workbook. The MaxL syntax can be found here.

Filter

Note the common practice of locking down a dimension with “no_access” and then selectively opening it up with read or write lines.

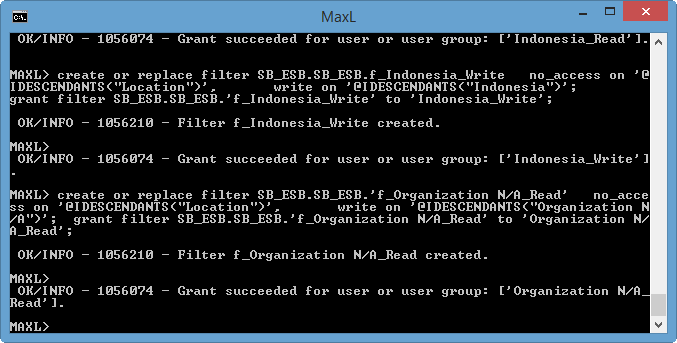
If we paste the MaxL into a MaxL command line, we’ll see that the filter is created and granted to the specified group. But what if we want to create these commands in bulk in Excel? We simply use formulas with the concatenate function.

Using Excel formulas, we can craft the following file:

9-30-2015 12-57-21 AM

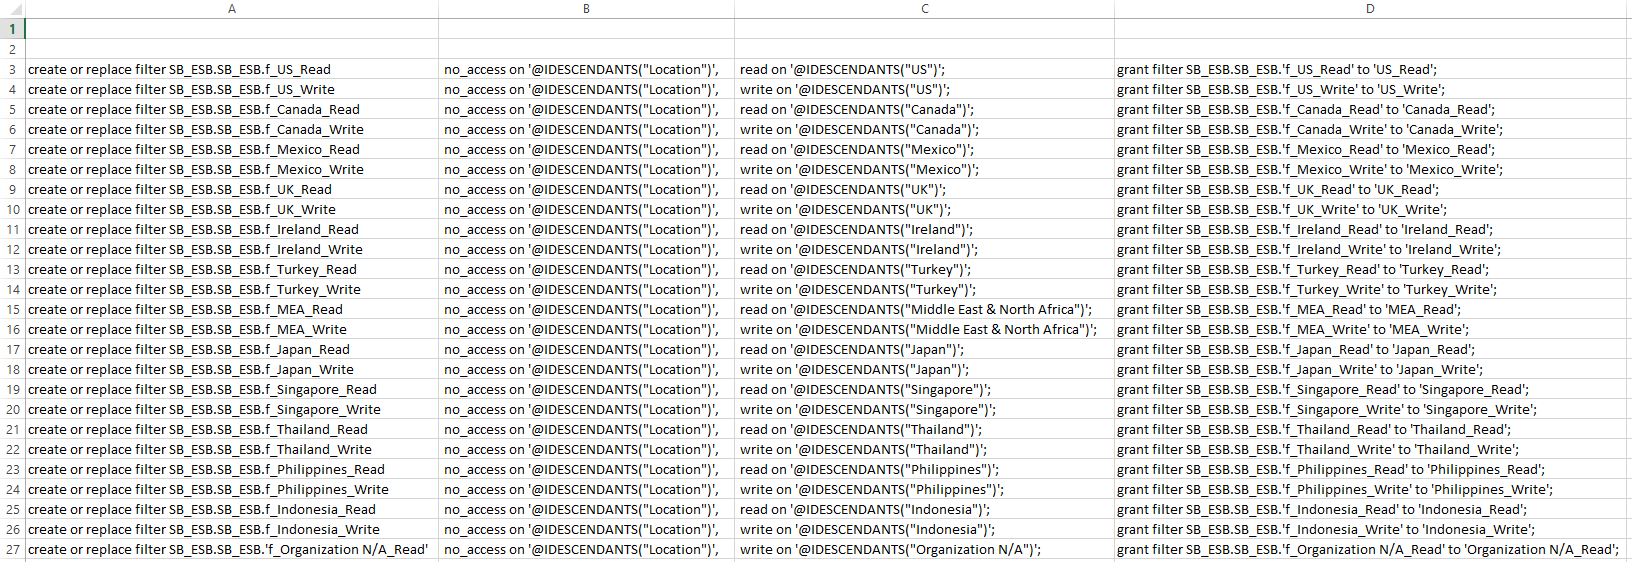
The MaxL above is broken up into four columns. These columns have the following formulas:

Column A: =CONCATENATE(“create or replace filter SB_ESB.SB_ESB.f_”, Groups_and_Users!A3)

Column B: =CONCATENATE(” no_access on ‘@IDESCENDANTS(“”Location””)’, “)

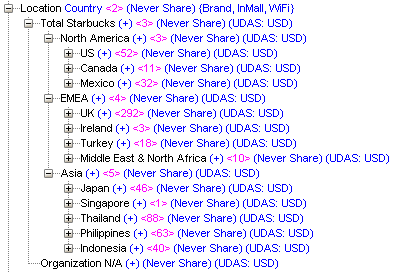
Column C: =IF(RIGHT(A3, 4) = “Read”,CONCATENATE(” read on ‘@IDESCENDANTS(“””, Groups_and_Entities!B3, “””)’; “),CONCATENATE(” write on ‘@IDESCENDANTS(“””, Groups_and_Entities!B3, “””)’; “))

Column D: =CONCATENATE(“grant filter SB_ESB.SB_ESB.’f_”, Groups_and_Entities!A3, “‘ to ‘”, Groups_and_Entities!A3, “‘;”)

Note the use of spaces and quotes in the formulas above. Also note that by placing the words “read” or “write” in the actual group names, we can reference this in the formulas when building the filters, thus granting either read or write access.

Once our formulas are sorted, we can simply paste the MaxL directly from Excel into a command prompt. Our filters are immediately created and granted to all of our groups. Subsequent changes are as easy as a copy/paste into MaxL.

9-30-2015 12-54-20 AM

Create a Hyperion Planning Security Import File

The last step in our process is to create the file to import security into our Hyperion Planning application. Again, we will use Excel and basic formulas. Like LCM, it can be helpful to add a minimal amount of security to Hyperion Planning manually, and then export a sample secfile.txt file. This can be helpful when determining the format of the import file.

To export a Planning security file, navigate to the Planning directory on the server:

Oracle\Middleware\user_projects\epmsystem1\Planning\planning1

Execute the following command (update the app, user ID and file location):

ExportSecurity.cmd /A=SB_BSO,/U=admin,/TO_FILE=C:\\temp\\SecFile

Review the security export file.

Our test security export contains the one piece of security information we assigned manually in Hyperion Planning:

US_Read,US,READ,@IDESCENDANTS

We can now craft our full import file using this same format.

In Excel, we can build a file like this:

9-30-2015 1-37-40 AM

Here is the Excel formula that concatenates this information from the Groups_and_Entities tab:

=CONCATENATE(Groups_and_Entities!A3, “,”, Groups_and_Entities!B3, “,”, Groups_and_Entities!D3, “,”, Groups_and_Entities!C3)

We can then copy the contents of this file into the secfile.txt in the planning folder. Unfortunately, the ImportSecurity utility must generally be run from the server, in the following directory:

Oracle\Middleware\user_projects\epmsystem1\Planning\planning1

Upload the security with the following command:

ImportSecurity.cmd “SB_BSO,admin,SL_COMMA,0,”

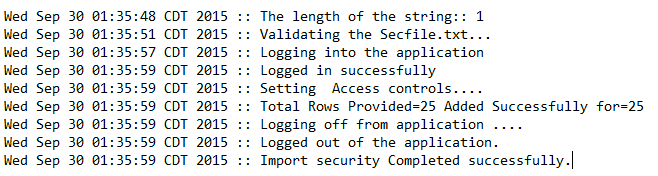
Check the ImportSecurity.log in the following directory:

Oracle\Middleware\user_projects\epmsystem1\diagnostics\logs\planning

Look for something like this:

9-30-2015 1-40-01 AM

In Summary . . .

Building security manually is a tedious, time-wasting exercise. And in the end, administrators are left with a manual process to maintain. By centralizing security development in an Excel workbook, developers can create exports that feed the various EPM components. While these exports require different formats for LCM, Essbase and Planning, the mechanics that produce the files are similar. Developers can use basic Excel formulas to craft files into the correct import file formats. Then import the files.

This approach has several benefits:

  1. EPM Security Maintenance is centralized in a single workbook.
  2. EPM Security is self-documenting. (It’s all in the Excel workbook.)
  3. The EPM Security Workbook makes a good security backup.
  4. The EPM Security Workbook can be versioned and archived.
  5. Security migrations are simplified because the same files can be imported across multiple environments.
  6. Importing files is infinitely faster than creating security manually.

A copy of the workbook used in these examples is available here.